Okay Part 2: Also note lug nuts are reverse thread for the drivers side! Another tool needed: a mini sledge would help. You can get ball joint socket on ebay(snap on or various makes) or amazon for 20$ Sunex 10213 1-59/64-Inch Ball Joint Socket A quick note on parts also(Bernbaums sells a complete kit for these cars and includes (250$ and 270$) FRONT END KIT
Kit includes: 2 upper ball joints, 2 lower ball joints, 4 upper control arm bushings, 2 lower control arm bushings, 2 strut arm bushings, 2 outer tie rod ends. You need the inner tie rods and your pretty good to go, i went piece meal because i grabbed the moog ball joints first then later saw the bernbaums kits. But I didnt mind since i want the best stuff i could get. I think bernbaums is fine but I wanted the "professional" and upgraded parts if I could get them. I don't know what ball joints he uses so he might be using moogs, then im an idiot. I will go through the parts first that are easy swaps and require no real explanation: The straight forward easy parts: a. Shocks(one bolt at the bottom, nut at the top, off they come). The KYB will require some cutting on the top shock mount bushing. the front shock seems tiny(I may beef these up later) but I got the KYB's Gas A Justs People seem to buy the Monroes(i will never buy a monroe shock in my life again), Gabriels, or Kybs. Just get the KYB's. KYB rear is KYB KG5511 (rockauto 31$) KYB Front - KG4507 (27.99$) and i got rebate of 40$ back(KYB seems to run rebates all the time). Gabriels are list as "economy" the KYBs are "enhanced" b. Front stabilizer bar bushings(improved design, poly) Rockauto 16$ for the set.... Rare Parts price for the same moog part... 41$...  :wince: I would lube these up pretty well. :wince: I would lube these up pretty well. MOOG K7039 {#2084045} Info Front; IMPROVED DESIGN Eurethane. Onto the more complicated. I will attempt to do this in order: STEPS: if responding please refer to "step 1... step 2"... etc 1. Clean undercoating/oil from end of bolts/nuts, spray everything you can and keep spraying(for days if you can) with PB Blaster or whatever rust parts remover you have(I like Kroil and PB the best or make your own, with ATF and Kerosene, see youtube, can save you alot if you use tons). Spray torsion torque arm bolt(up inside transmission mount- one big bolt on each side, you will need a small wire brush to get to these, torsion bar housing sockets(front and rear), (ball joint-tie rod ends-center link-shocks-control arm-stab bar-bump stop) nuts and exposed bolts. 2. Brake drums and backings should be off(be very aware of the way the backing was mounted and the pads. This can be critical, even to where the spings are hooked, take a picture and double check. Brake line capped off so it doesnt empty your brake system. 3. If your car is extremely rusted, I would use a wire brush on the backside of exposed bolts and wire wheel/brush them and then recoat a couple times, this will make your life much easier. The real work 4. Before you start? Are you removing the ball joints? If yes then you might want to take a crack at breaking the upper ball joint now since the car will support you pulling a big breaker bar. Simply remove the upper ball joint cotter pin and castle nut, Put the castle nut on the end just slighty and use your harbor freight ball joint popper and the impact gun. The popper is 3/4 inch i think, you can use it the fun way(it goes off like a gun, wear eye protection) or simply put pressure and hit the side of the spindle where the ball joint sits with a hammer, it will boringly pop out). With the ball joint now lose, use your ball joint removal socket and a big breaker bar and get it moving off, hopefully. The upper is the easy one since its threads are not sitting in rust. The lower is a fight since you have to hold the socket and breaker bar "up" against the control arm. Unless you have a brave friend, do this off the car. 5. Tie rods, these are easy, pop off the cotter pins, nuts and go to town with the ball joint popper. Outer tie rods are everywhere, inners are expensive, I had to go to PST for inners (130$ shipped for two, 138$ for one at rare parts! ), outers I got from Bernbaums (38$ each vs Rare Parts at 67$ ) leave the tie rods together and make sure your putting them back with same sizing/angles. I noticed the bernbaums have a slightly different angle than these stockers, shouldnt matter. 6. Ball joints, pop them off as in step 4, very simple. Ball joints K719 and K722 (moogs, 31$ and 15$) I got all 4 for 70$ shipped at amazon. Rare parts... like 86 and 28$??? Acdelco pros are 36$ and 28$, I was torn between moog and ac delco pro. 7. Upper control arm, very simple also, two bolts off the top and it comes off. 8. Idler arm, simple and straight forward, use the ball joint popper, yank the bolt off and pull it. (AcDelco poly bushing is gone(oos), bernbaums has a old style rubber for 31$?, ball bearing kit is like 65$?) 9. pop center link off pittman arm and complete removal of the center link if your repainting, checking etc... 10. Lower control stabalizer links(big nuts inside front of frame, these are kind of a pain, but keep fighting. 11. While you at it, look back about a foot and youll see the lower control arm nuts on the crossmember, I think its the same socket you just used on the stabilzer bar so take those off if your removing the lower control arm. 12. Lower control arm: a. Jump under the car first and see if you can turn the 15/16 bolts that are farthest outboard underneath on the transmission crossmember(these are you torsion bar tensioning bolts). Youll prob need the breaker bar. these are fine threaded and long. There is a round barrell nut up inside the crossmember, I have heard they can "spin", i you slip you hand up in there you can feel it, if it spins put a flat piece of metal at the end of the barrel nut and wedge it. b. If your lucky they will simply come off, i had one be a bear and the other came right off after soaking. c. There may be a cap in the back of the torsion bar(in the back round mount) pop that out and the clip(pliers) d. Now your ready to take the lower control arm off, put the castle nut back on the front control arm bolt sticking out of the cross member and whack it with the mini sledge, use a piece of steel or board or what ever if you want. I just hit it and the control arm and torsion bar should start moving back e. Once the steel on steel jolt starts the lower control arm moving, grab a board and place it on the lower control arm tight and hit it with the sledge, this should take the torsion bar back even farther. You can then remove the control arm off the front of the torsion bar. 13. If removing the torsion bar, carefully line it back up in the rear mount and bump it forward with something soft in the rear to move it forward and out, do not scar, drop, nick or damage these. Mark them with tape left and right. 14. Bushing installs, this is a standard deal, THE LOWER CONTROL ARM BUSHING HAS A CLIP IN IT, beware... That lower bushing is a bear. Use presses, take it to a shop or use bushing install tools to remove and replace these. The bushing comes out with the nut attached at the rear. there are two uppers and one lower (I got the ACDelco's. Lowers are ACDELCO Pro 45G9002 @ 9.62$ and uppers are ACDELCO Pro 45G8004 31$ at rockauto, I got uppers closeout at amazon for 8$ somehow. Rare parts are 40$ per bushing... 15. Lower control arm ball joint removal from arms... you will need to support these somehow to get an serious hold on them and huge breaker bar is normally needed. I heated mine slightly, if you need to also(maybe read info!). I placed a bar through the old upper bushings and mounted it to my hemi engine to get enough umph to get them off. I fought with the lowers also. 16. Bump stops are easy enough. reuse or Bernbaums has them(uppers/lowers for 15$). Rofl rare parts charges 85$ for two uppers. I think im reusing mine as they are in nice shape. clean it all up, por15 it and reassemble... Thats it. I think. Check the info below on parts. see info attached. I will recap my price total later. Just noticed the 250 lbs on the Chrysler ball joints WTF!
Edited by mikes2nd 2017-05-16 12:02 AM
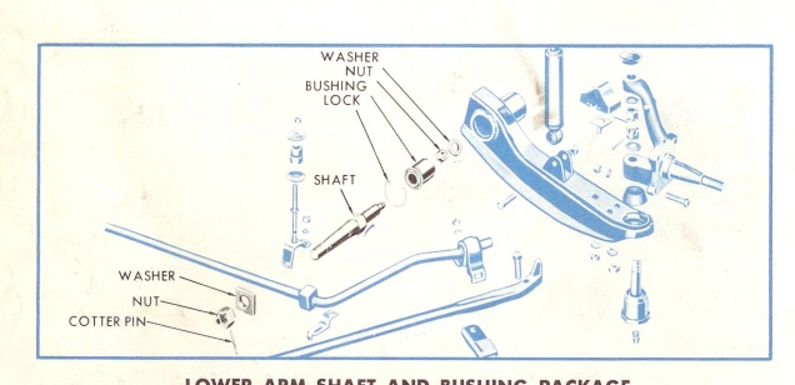 (lowercontrol.jpg) (lowercontrol.jpg)
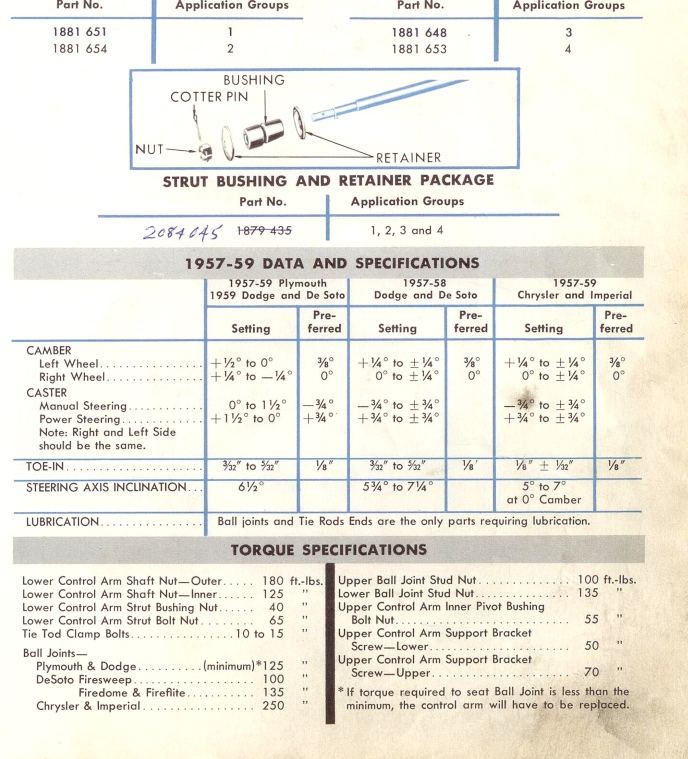 (Specs.jpg) (Specs.jpg)
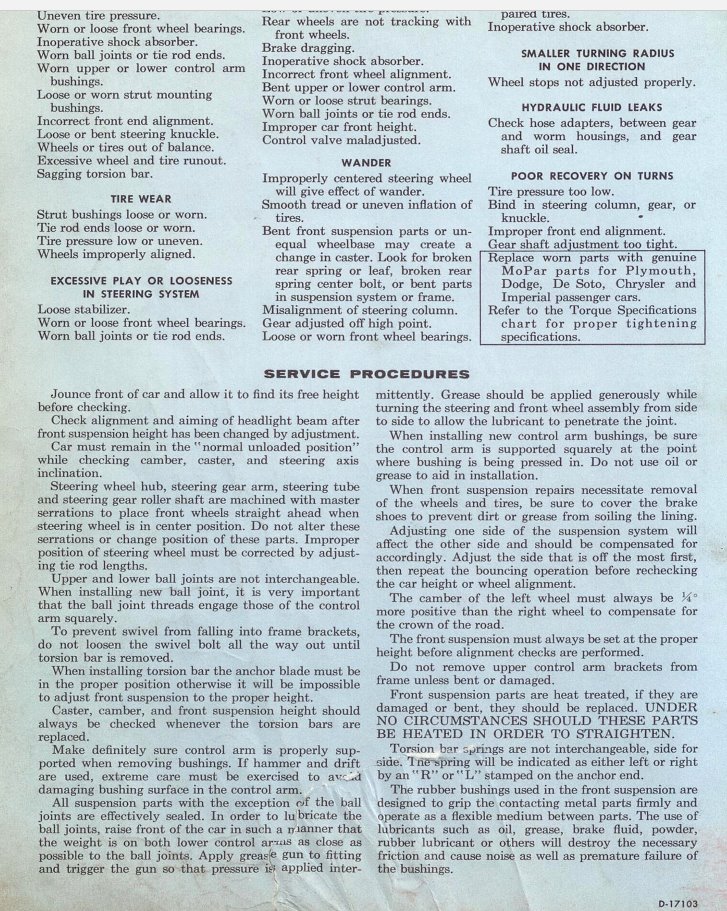 (info.jpg) (info.jpg)
Attachments
----------------
 lowercontrol.jpg (157KB - 764 downloads) lowercontrol.jpg (157KB - 764 downloads)
Specs.jpg (225KB - 782 downloads)
info.jpg (249KB - 703 downloads)
| 


 and things are finally going together