|
|
Veteran
Posts: 129
 
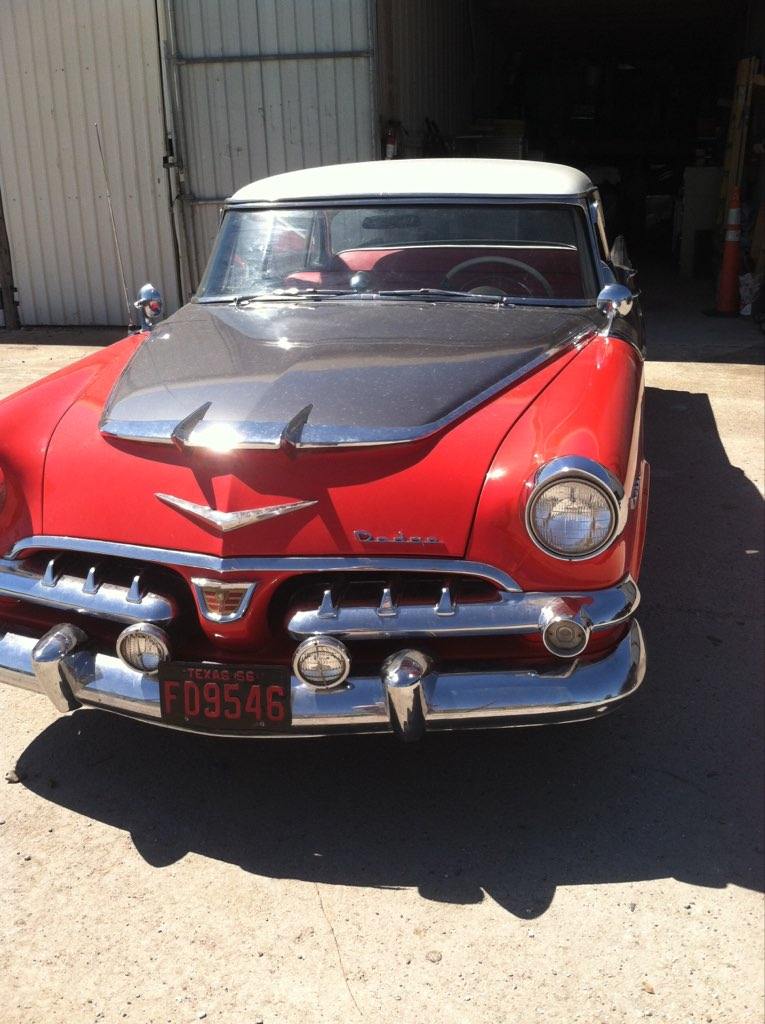
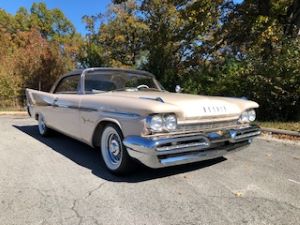
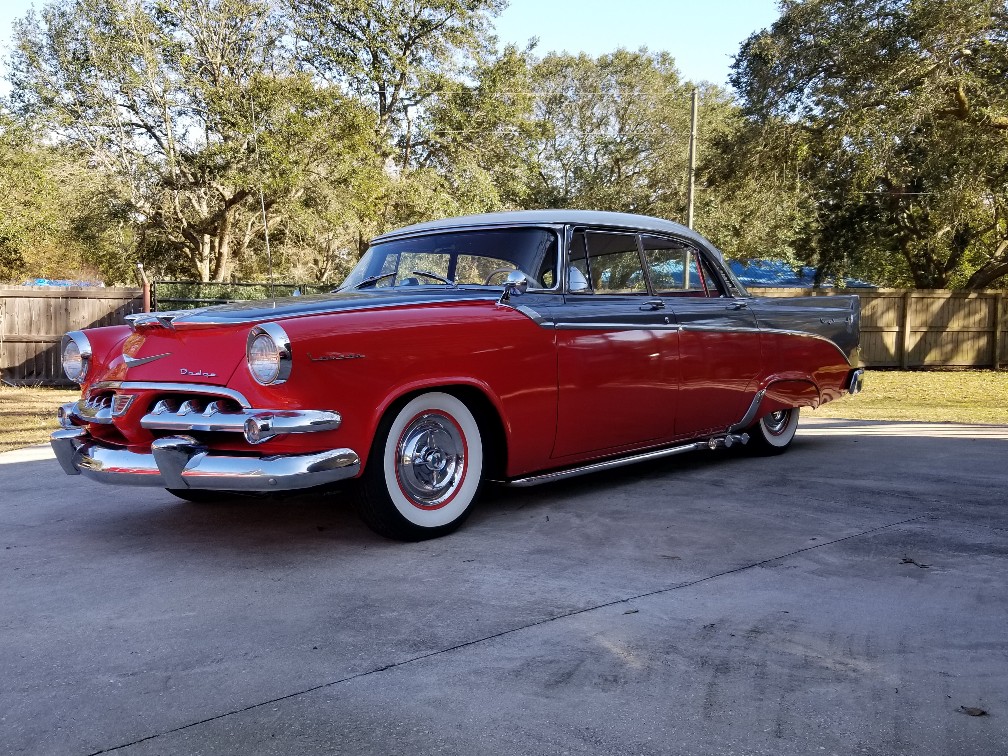
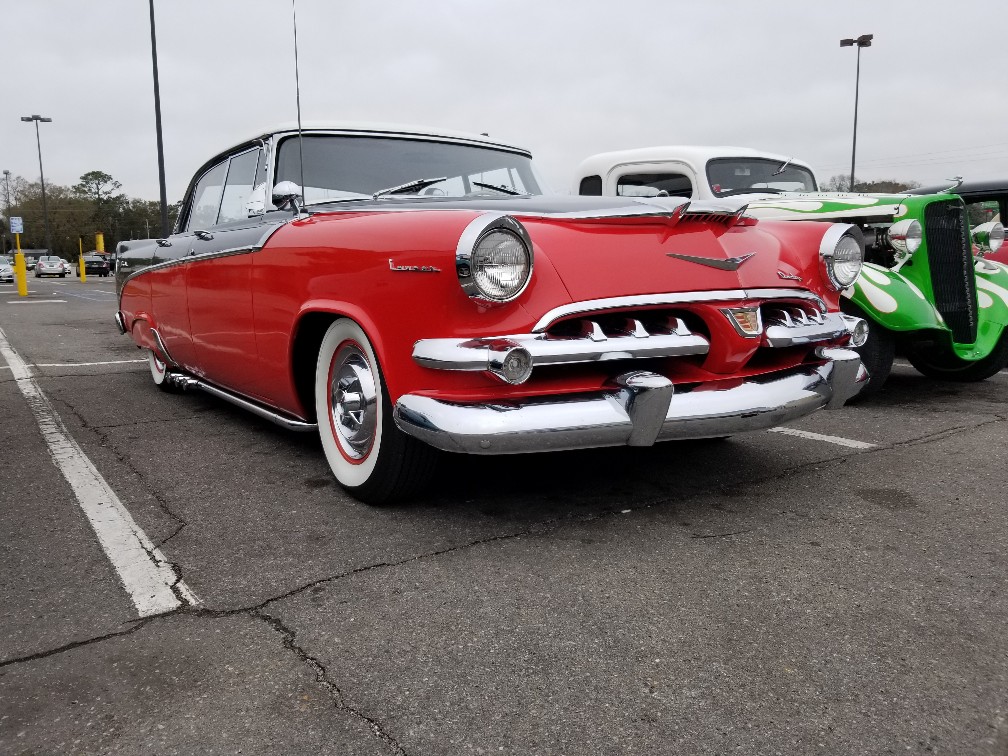
| Hi, I've been a member here for a while as I work on my 58 plymouth and have learned a lot from this site but I've recently acquired a 56 Royal and thought I might be able to give back a little as I tackle some of the issues I've run across. Some issues I've found it difficult to find the information I desired.
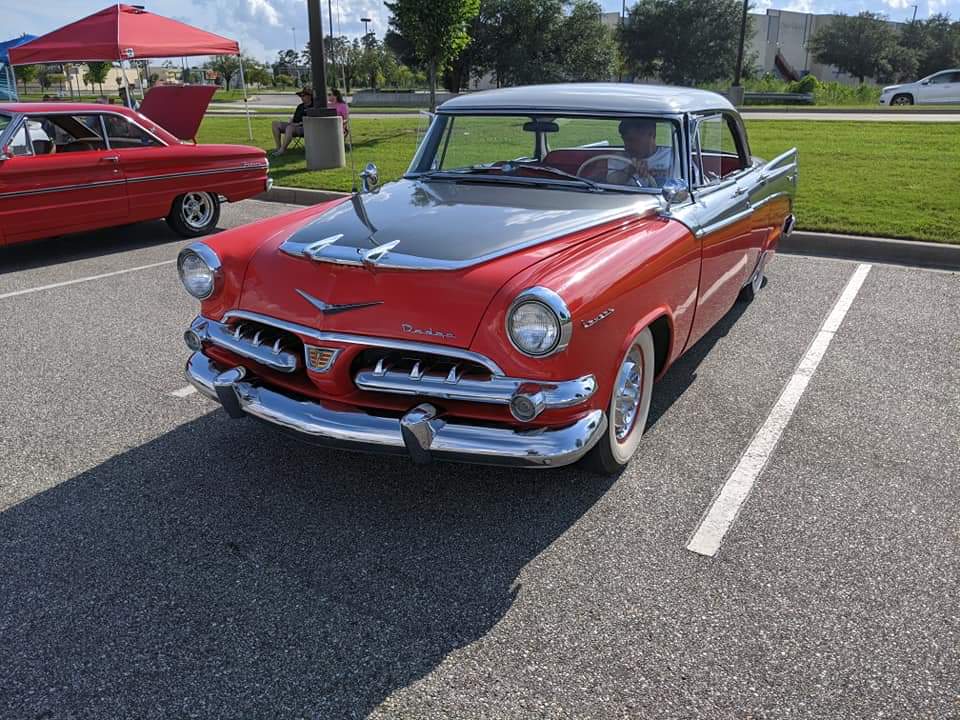
First off, I'm the proud new owner of a 56 Dodge Royal 4dr hardtop! The first thing I had to tackle was the carb. The accelerator pump seal was completely gone! A rebuild kit and its running great!
 (IMG_0044.jpg) (IMG_0044.jpg)
 (IMG_0043.jpg) (IMG_0043.jpg)
Attachments
----------------
 IMG_0044.jpg (111KB - 374 downloads) IMG_0044.jpg (111KB - 374 downloads)
IMG_0043.jpg (151KB - 371 downloads)
|
|
| |
|
Veteran
Posts: 129
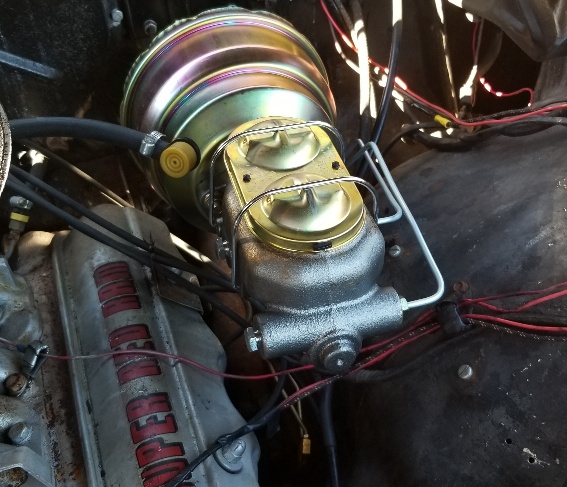
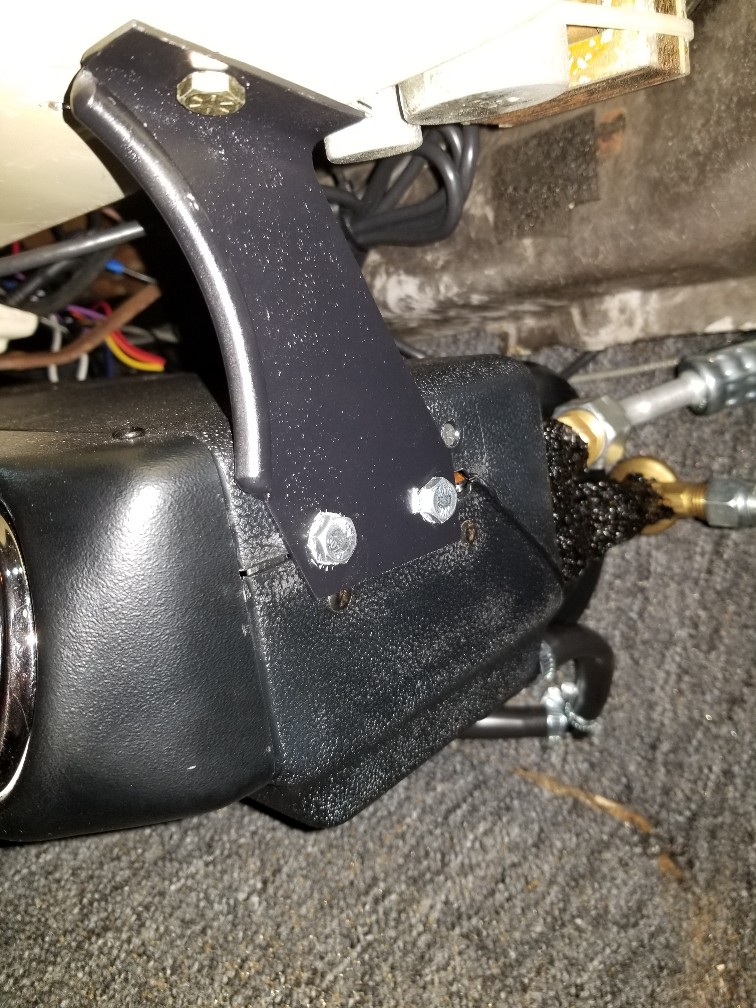
| Then the brakes. An AAJ disc front kit had been installed but It appears the bellow booster was not boosting! May have been an adjustment because it holds vacuum but I tried adjusting it and finally started unbolting that crap, ordered a modern dual chamber booster with a duel master cylinder, added a proportioning valve and I had brakes! |
|
| |
|
Veteran
Posts: 129
| I used a booster/master cylinder kit designed for a B-body, 8". Can't seem to figure out how to attach a picture now.... |
|
| |
|
Veteran
Posts: 129
| Think I figured it out
 (20200209_115924_copy_567x487.jpg) (20200209_115924_copy_567x487.jpg)
Attachments
----------------
20200209_115924_copy_567x487.jpg (117KB - 363 downloads)
|
|
| |
|
Veteran
Posts: 129
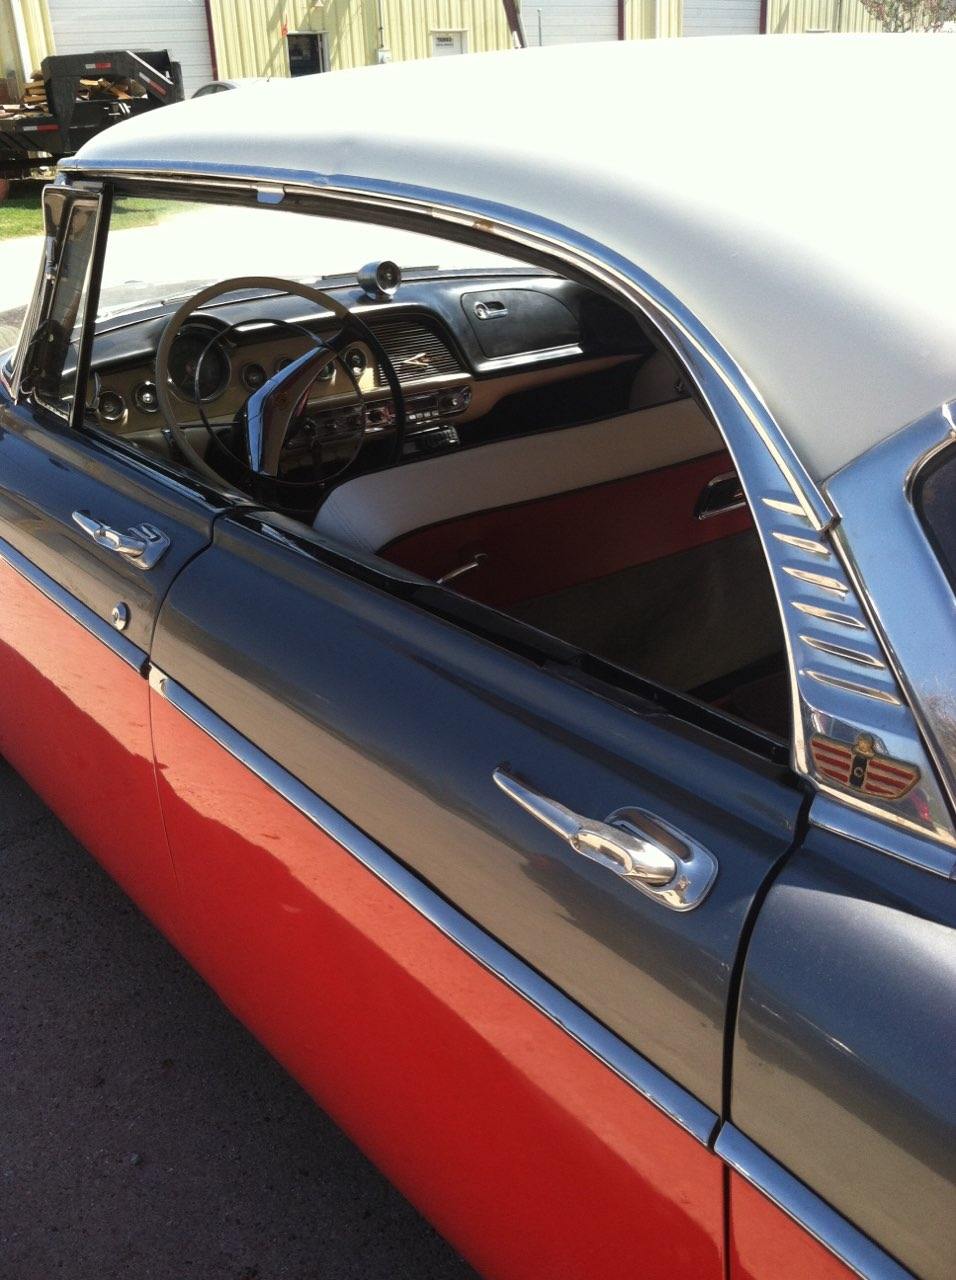
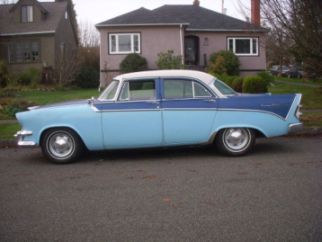
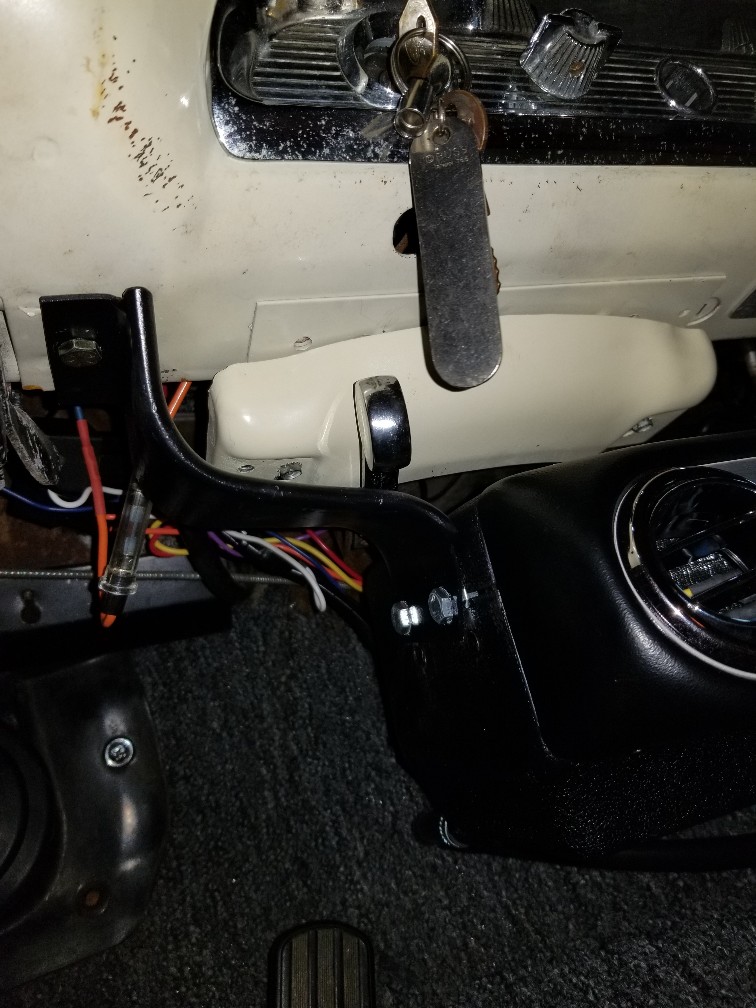
| The car apparently sat in storage a while or hadn't been used in a while. The windows all were hard to roll up and down and the chrome needed a good polish. I took the door panels off, greased the windows up, the wife and I cleaned and polished and cleaned some more......then on to our first cruise in.
 (20200215_164508_copy_1008x756.jpg) (20200215_164508_copy_1008x756.jpg)
Attachments
----------------
20200215_164508_copy_1008x756.jpg (261KB - 368 downloads)
|
|
| |
|
Veteran
Posts: 129
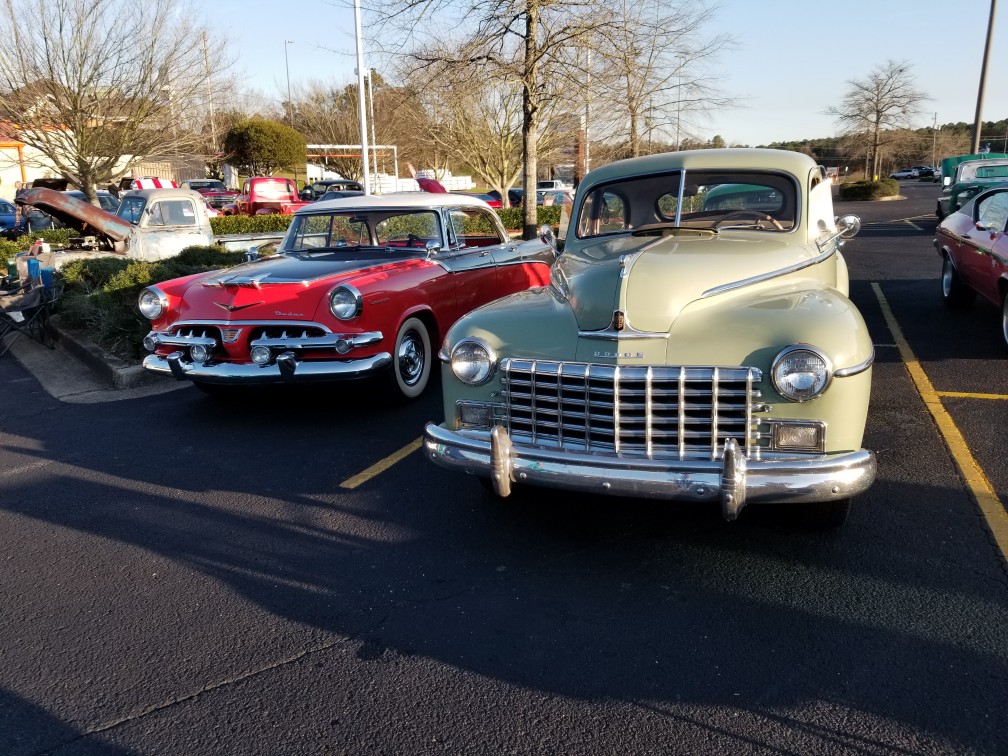
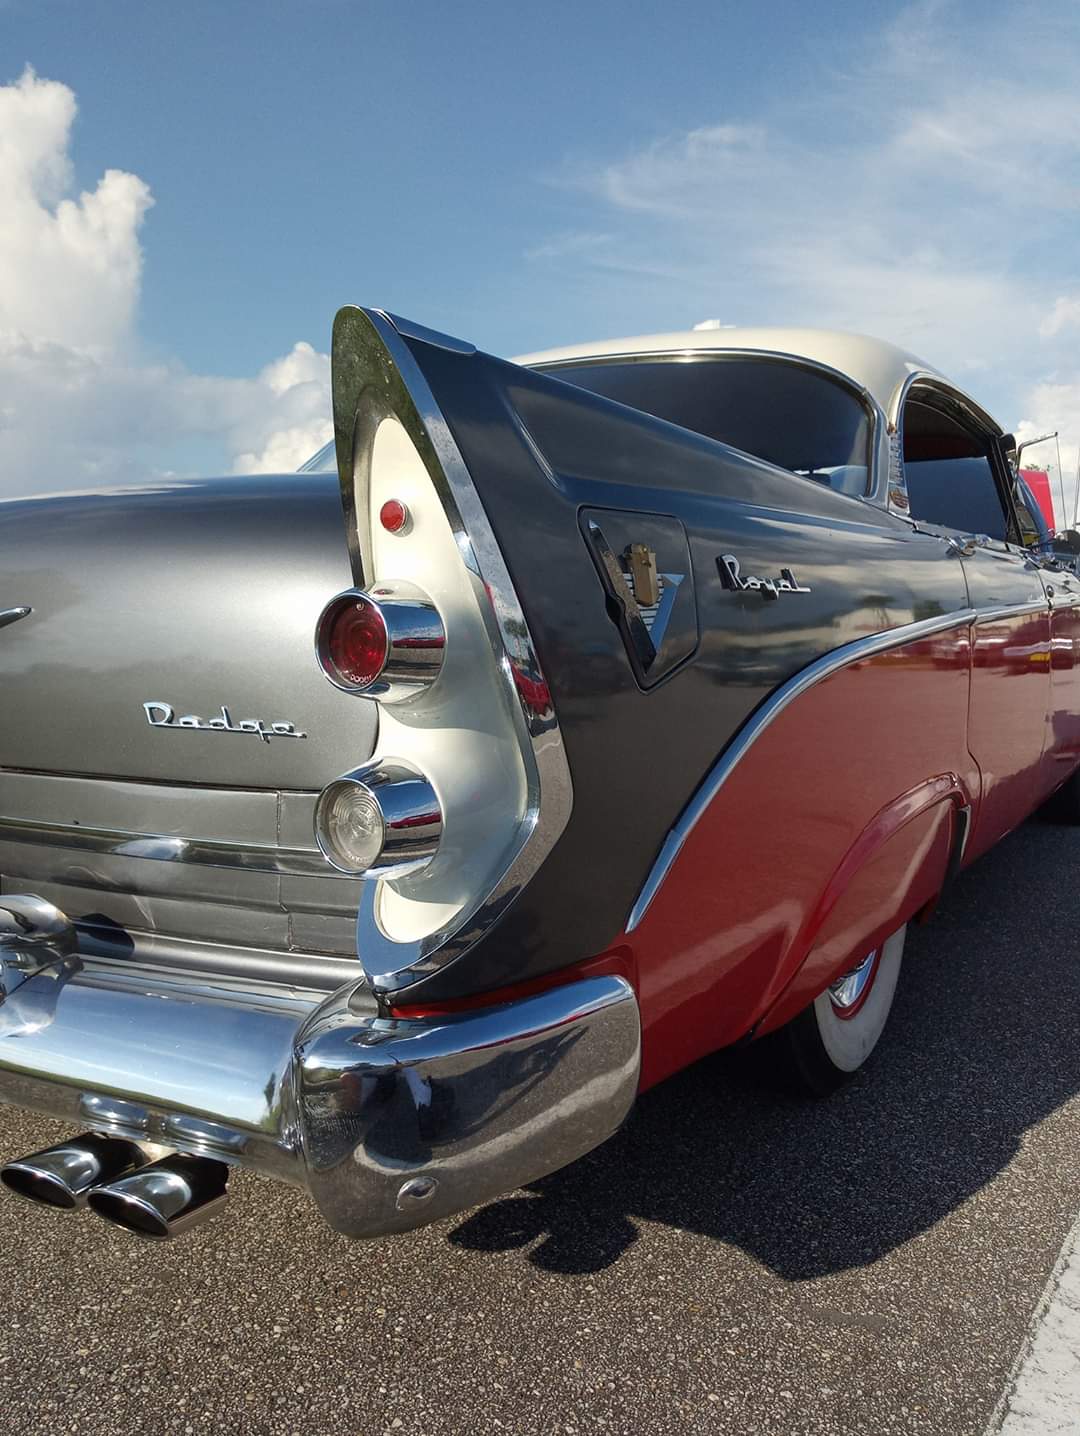
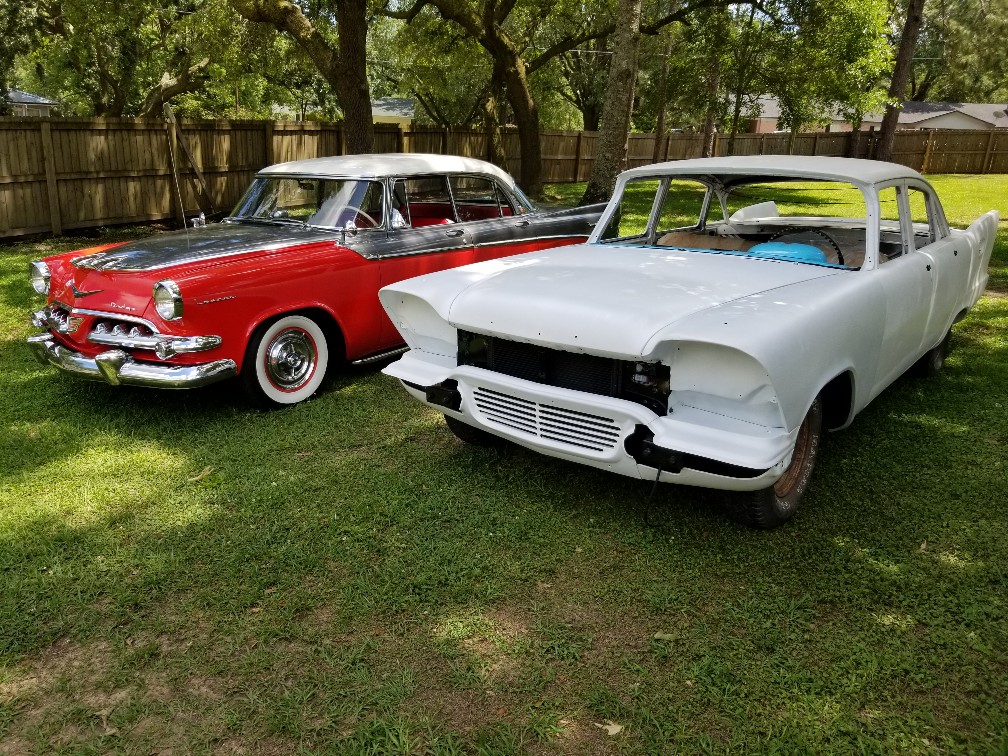
| This was our 48 D24 but we recently sold it. Acquiring the 56, I was out of room. We had a blast with the 48, time for a change so that lead us to the 56. Hope to have as much fun with it but still addressing a few issues right now. It had fender skirts when I bought it but the matching hub caps would not fit with the shirts on. The skirts were also bent out to increase clearance. Oh, after the first cruise, I noticed the rear brakes heating up. Pulled the hubs and one side is not so good. Appears the hub is warped, shoes unevenly worn....so time to swap rearend |
|
| |
|
Veteran
Posts: 129
| I searched hi and low for a 8-3/4, then started searching for a Chrysler 8.25 but couldn't find either the right width. Btw, I measured the rear in the 56 and it is 61" WMS to WMS. I wanted something about 59-1/2. Jeep Cherokee 8.25 would be ideal but couldn't find one. Also, using a gps, my speedo was off so it'd be nice to find a gear ratio to make it right and also be more cruise friendly. By doing the math, I needed to go from 3.54 grease to 3.07. As luck would have it, I found a ford explorer 8.8, 59-1/4" 3.08 gears at the local pull-a-parts. The son and I pulled it and it's going in soon. |
|
| |
|
Veteran
Posts: 129
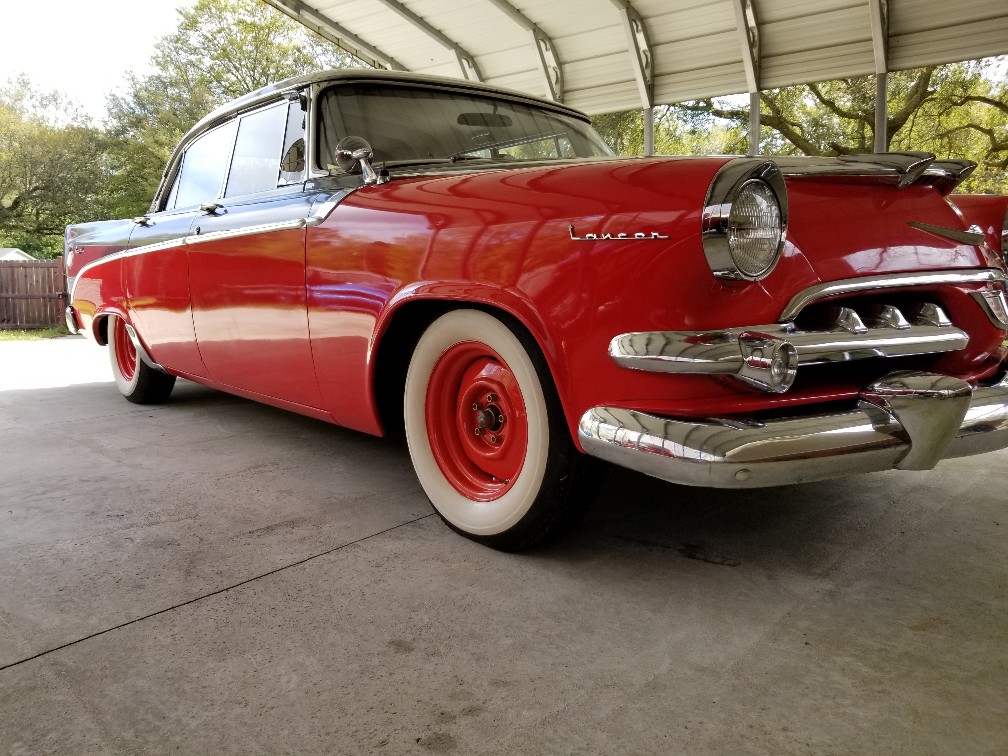
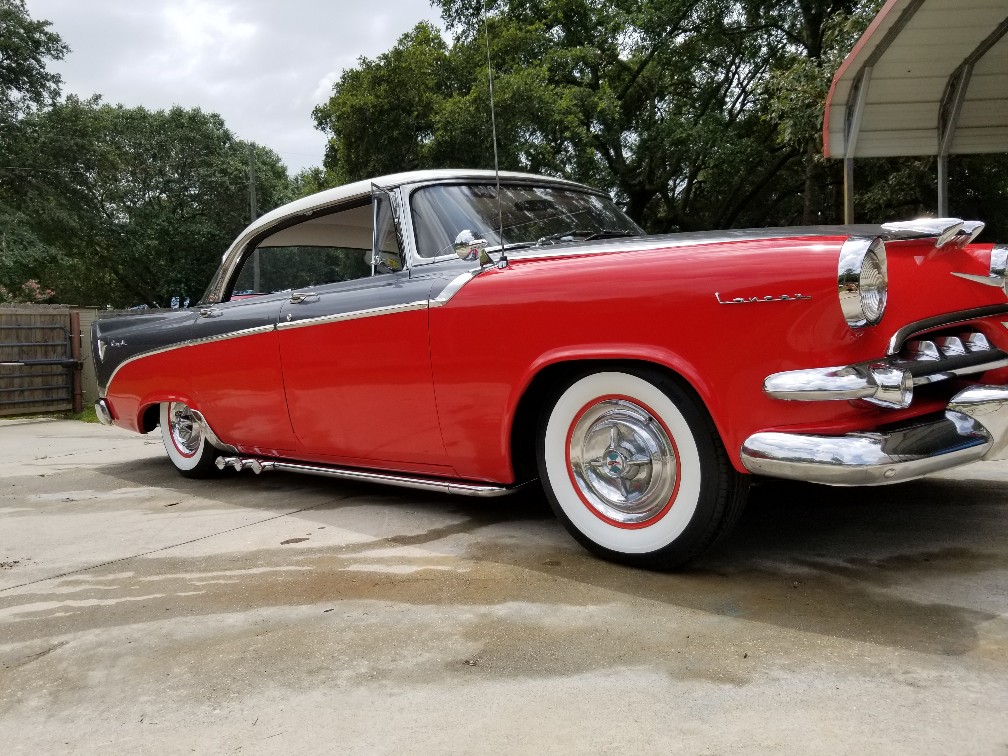
| The wheels was something else I wanted to improve. The paint was flaking off and wasd too red, didn't match the car. Do I painted them. Tried to get the wife to buy the no hubcap look but she liked it better with hubcaps.
 (20200314_102850_copy_1008x756.jpg) (20200314_102850_copy_1008x756.jpg)
 (20200314_114956_copy_1008x756.jpg) (20200314_114956_copy_1008x756.jpg)
Attachments
----------------
20200314_102850_copy_1008x756.jpg (226KB - 370 downloads)
20200314_114956_copy_1008x756.jpg (237KB - 362 downloads)
|
|
| |
|
Veteran
Posts: 129
| The paint I bought didn't match exactly, it's a little lighter but not too noticeable |
|
| |
|
Veteran
Posts: 129
| The engine and transmission leak fluid so I have gasket sets ordered..... that's going to be a job! Pulling the engine, gaskets and fresh paint......I also want to add under dash ac. |
|
| |
|
Expert 5K+
Posts: 5006

| thats a really nice combo. I though i loathed three tones but it actually looks good. |
|
| |
|

Expert 5K+
Posts: 9672
 
Location: So. Cal | The 8 3/4 that fits is from a B-body. The '65-'67 is the best one, but many people opt for the Ford 8.8. I don't like them because I can't change the gears in them easily and I tend to swap gears around more often than one would expect. |
|
| |
|
Veteran
Posts: 129
| Thanks Mike and yes powerflite, 8-3/4 was my first choice but I was having difficulty finding the width and ratio I wanted. I found one I'd have to cut down then buy gears, might as well replace bearings..... the cost was significant compared to the 8.8. I checked the centerline of axle to u-joint and it's only 1/8th inch different. Ordered a 7260 to 1310 conversion joint so driveshaft should work. Also, the pinion offset on the 8.8 is about 7/8" more than the stock 56 rear. I don't think that will be a problem. We'll see.... |
|
| |
|

Expert 5K+
Posts: 7401
Location: northern germany | What is/was wrong with a stock OE axle? Very nice car.
Edited by 1960fury 2020-03-23 7:58 AM
|
|
| |
|
Veteran
Posts: 129
| 1960fury - 2020-03-23 6:58 AM
What is/was wrong with a stock OE axle? Very nice car.
The biggest issue for me is the width won't allow these hubcaps with fender skirts. But there's a couple other reasons. I'd prefer higher gears and brake maintenance with tapered axles....I'll give it away to anyone willing to pick it up from Mobile AL. |
|
| |
|

Veteran
Posts: 141
Location: Simi Valley, CA | Great Looking Car! Personally I like the look without the skirts. Also check u-tube, there is a original commerical the showcases a 56 Custom Royal hardtop that will give some inspiration. Also I believe the wheels were a off white.
Have fun! I have a 55 Custom Royal lancer Hardtop for over 25 years.
Enjoy!
Ernie Baily
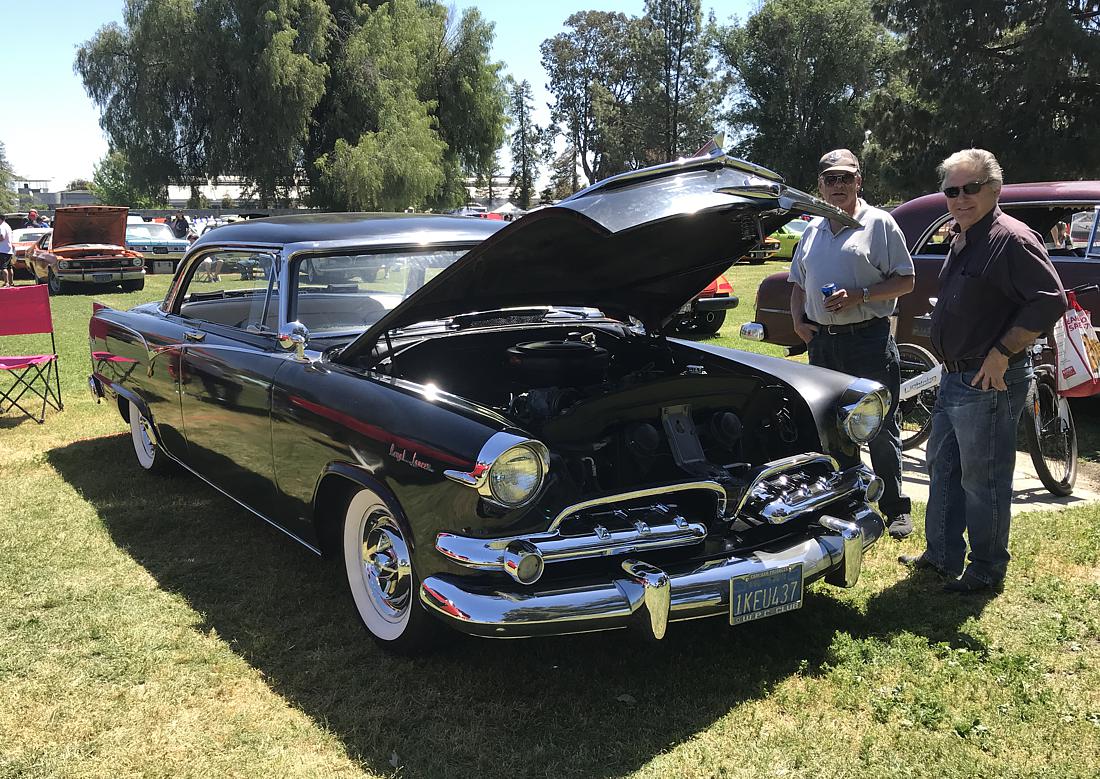 (SF2019 55 CRL.jpg) (SF2019 55 CRL.jpg)
Attachments
----------------
SF2019 55 CRL.jpg (249KB - 379 downloads)
|
|
| |
|
Veteran
Posts: 129
| Thanks Ernie, nice 55! |
|
| |
|
Veteran
Posts: 129
| Finally got the rearend swapped. Turned out more difficult than it should have been. The width is perfect for using fender skirts, had to move the spring perches about a half inch each but shock mounts was a pain. Had to fab some brackets to the spring perches from the explorer. Then the driveshaft ended up too short. Luckily I was able to buy a spacer for the 8.8. Took it for a ride on the interstate and very happy with 3.08 gears. I done the math before buying a rearend and come up with 3.07 gears would correct my speedo. Speedo is right on the money now. I'm guessing maybe the transmission or the speedo gear is not correct for this car but it all worked out well. |
|
| |
|
Veteran
Posts: 129
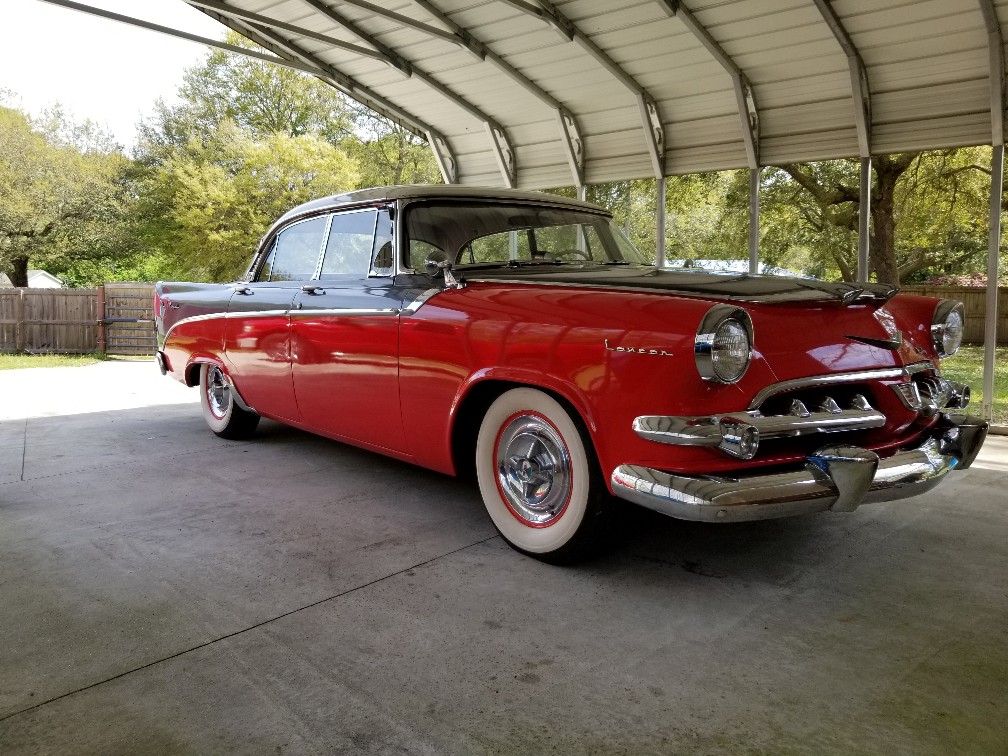
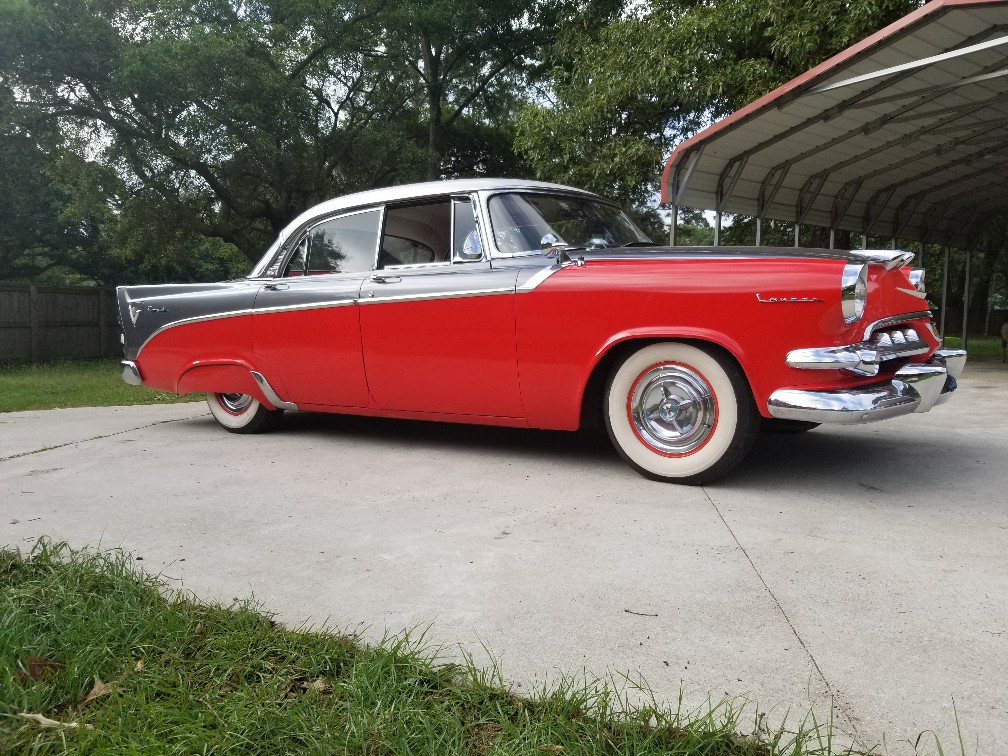
| With skirts and 8.8 rearend
 (20200409_083242_copy_1008x756.jpg) (20200409_083242_copy_1008x756.jpg)
Attachments
----------------
20200409_083242_copy_1008x756.jpg (274KB - 395 downloads)
|
|
| |
|
Veteran
Posts: 129
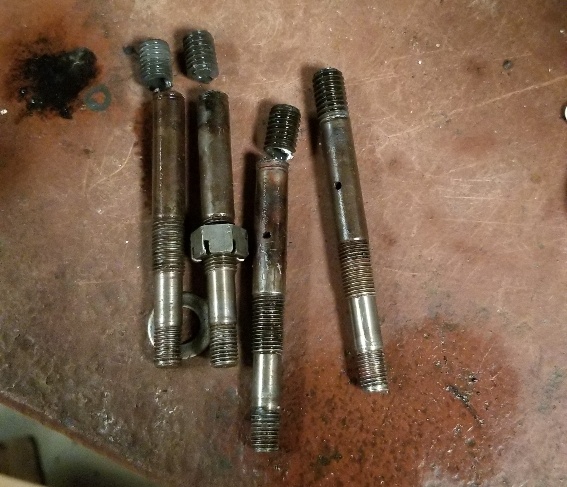
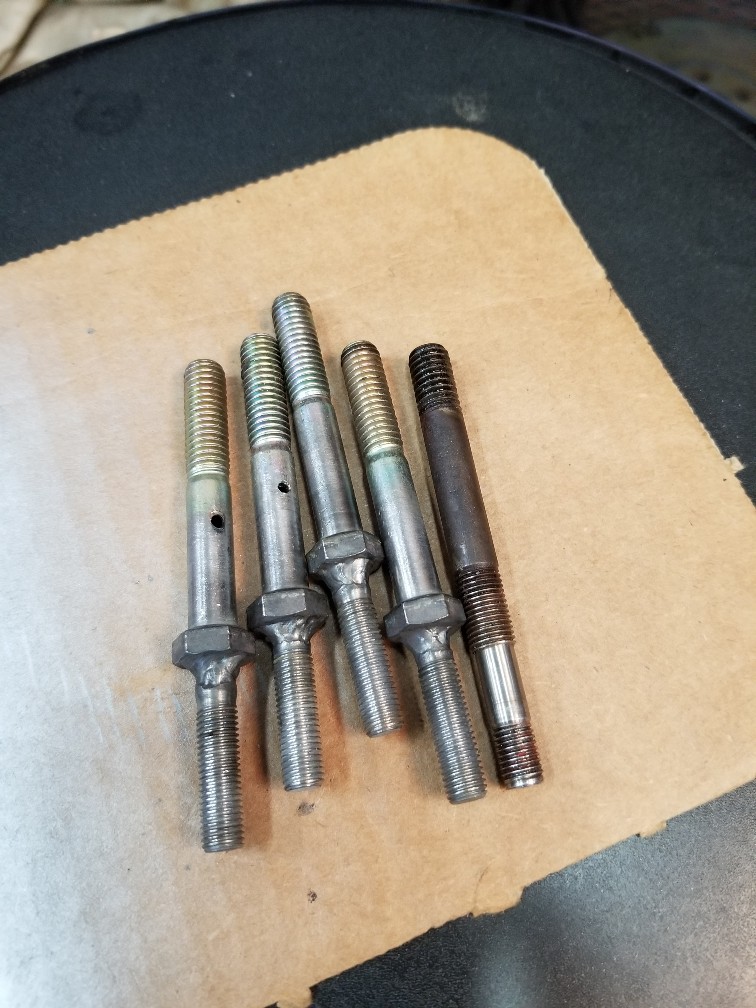
| Well, with all this down time, I pulled the engine and transmission to regasket. Everything was going great until I went to torque the rocker shafts. Broke 3 of the 4 hollow studs. Now I'm in a fix! |
|
| |
|
Veteran
Posts: 129
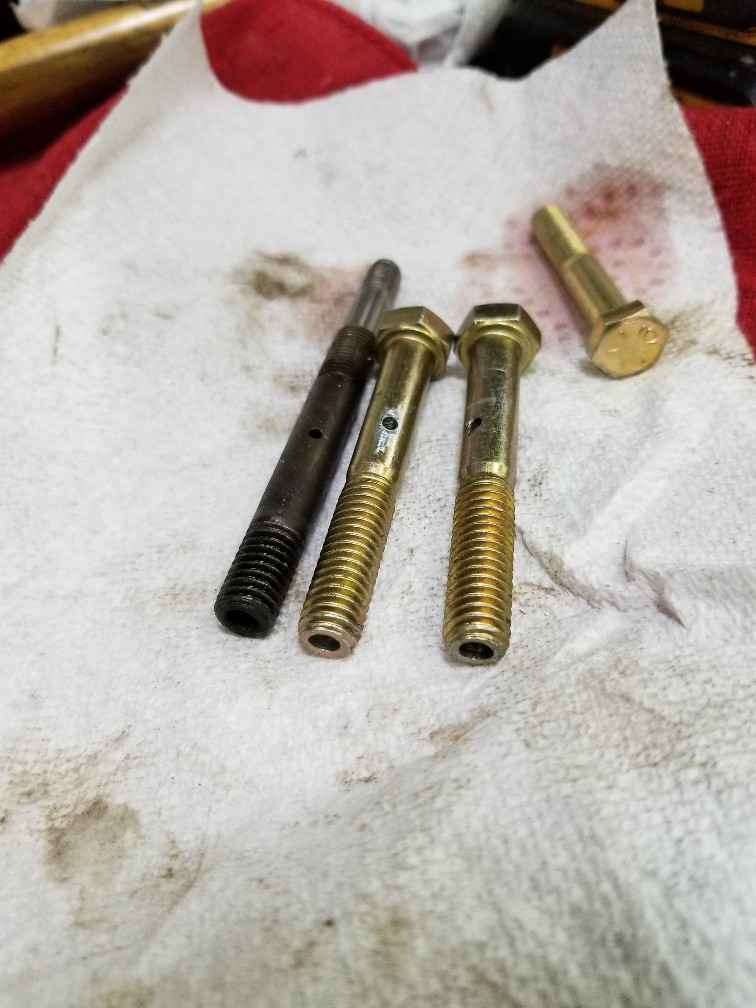
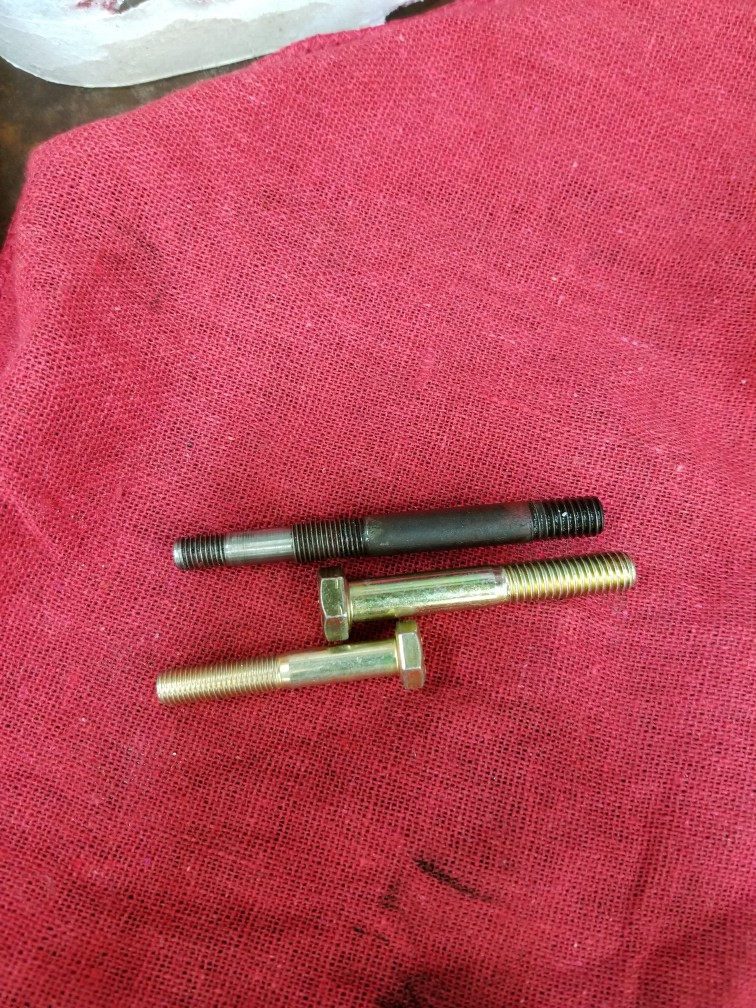
| Anybody know where I can get replacement studs?
 (20200503_144126_copy_567x487.jpg) (20200503_144126_copy_567x487.jpg)
 (20200502_133300_copy_756x1008.jpg) (20200502_133300_copy_756x1008.jpg)
Attachments
----------------
20200503_144126_copy_567x487.jpg (121KB - 386 downloads)
20200502_133300_copy_756x1008.jpg (188KB - 363 downloads)
|
|
| |
|
Expert 5K+
Posts: 9905
Location: Lower Mainland BC | .
bbdakota - 2020-05-03 4:57 PM
Well, with all this down time, I pulled the engine and transmission to regasket. Everything was going great until I went to torque the rocker shafts. Broke 3 of the 4 hollow studs.
You know, people say "No good deed goes unpunished" 
Sorry that happened but it is not quite the end of the world yet. I think that the PN for those 55-58 Dodge Poly V8 rocker studs is (Section 9-43-22. pg 9-52, in the 55-58 Mopar Parts catalogue).
On that basis, I found a NOS one on eBay (it's a start):
https://www.ebay.com/itm/NOS-1955-1958-Dodge-Plymouth-DeSoto-Valve-R...
I tried Len Dawson, Hilltop and Martin Kolner (arizona mopar parts) and came up dry. I can try my NOS guy tomorrow.

Edited by 56D500boy 2020-05-03 10:00 PM
|
|
| |
|
Expert 5K+
Posts: 9905
Location: Lower Mainland BC | .
I checked with my NOS guy this AM and he doesn't show any in his inventory. Sorry.
|
|
| |
|
Veteran
Posts: 129
| Thanks for going out of your way for me 56D500boy! Your efforts are much appreciated. I'm gonna try to build 2 hollow and 2 solid. I'll post pics if I'm successful.
Well, there's not much "if" to it. I don't have many choices...... |
|
| |
|
Veteran
Posts: 129
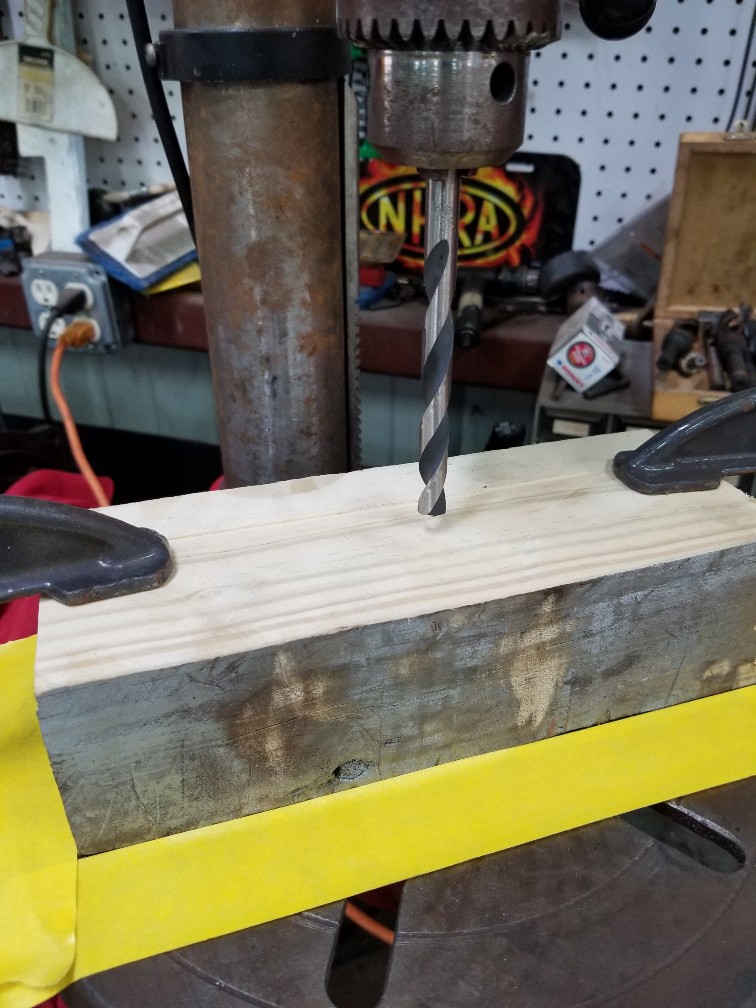
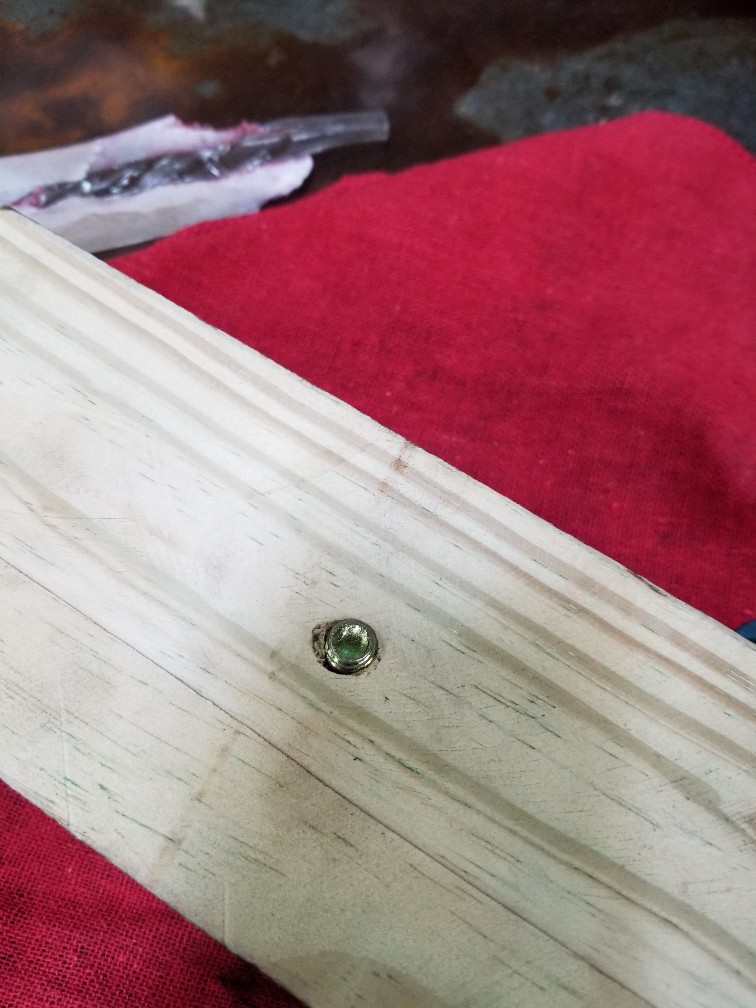
| I picked up some grade 8 bolts, drilled a 3/8" hole in a block of wood to use as a jig. Positioned the block in the same orientation and drilled the bolts. Hoping the block of wood would keep the hole parallel to the bolt. Not perfect but looks like it's gonna work. I found the short side for the cross drilled holes to keep from removing as much material as possible from the cross section. Tomorrow I'll cut down the 5/16 bolts and TIG them to the heads of the drilled bolts.
 (20200504_154916_copy_756x1008.jpg) (20200504_154916_copy_756x1008.jpg)
 (20200504_155237_copy_756x1008.jpg) (20200504_155237_copy_756x1008.jpg)
 (20200504_181802_copy_756x1008.jpg) (20200504_181802_copy_756x1008.jpg)
 (20200504_154900_copy_756x1008.jpg) (20200504_154900_copy_756x1008.jpg)
Attachments
----------------
20200504_154916_copy_756x1008.jpg (170KB - 366 downloads)
20200504_155237_copy_756x1008.jpg (147KB - 366 downloads)
20200504_181802_copy_756x1008.jpg (149KB - 375 downloads)
20200504_154900_copy_756x1008.jpg (317KB - 362 downloads)
|
|
| |
|
Expert 5K+
Posts: 9905
Location: Lower Mainland BC | bbdakota - 2020-05-04 2:31 PM
Thanks for going out of your way for me 56D500boy! Your efforts are much appreciated. I'm gonna try to build 2 hollow and 2 solid. I'll post pics if I'm successful.
Well, there's not much "if" to it. I don't have many choices......
No problemo. I like finding PNs and then looking for the parts - and not just for me. I like the challenge.
Don't all four have to be hollow to deliver oil to the rocker shaft?
I think you should buy the one on eBay to use as a template for anything that you make or get made.
NOTE: I didn't see your bolt drilling photos until after I posted. Good luck on completing them.

Edited by 56D500boy 2020-05-04 11:09 PM
|
|
| |
|
Expert 5K+
Posts: 9672
Location: So. Cal | You could also try tig welding the original ones back together if you bevel them to make sure you get great penetration. You should be able to re-cut the thread over the weld if you cut down the high spots. |
|
| |
|
Extreme Veteran
Posts: 445
Location: Beaumont TX | I just noticed that the ebay listing says 3 are available. This is an amazing find...
Can you find intake rocker arms for a 1955 259? And push rods? |
|
| |
|
Veteran
Posts: 129
|
"Don't all four have to be hollow to deliver oil to the rocker shaft?"
No, only one on each head delivers oil to the rocker shaft. |
|
| |
|
Veteran
Posts: 129
| Powerflite - 2020-05-04 8:51 PM
You could also try tig welding the original ones back together if you bevel them to make sure you get great penetration. You should be able to re-cut the thread over the weld if you cut down the high spots.
That is an option but I'm afraid by welding at the point where it broke, I'd take the temper out of the metal and create heat effected zones each side of the weld. There's also the chance metal fatigue had something to do with the breakage. I don't trust them. The ones I'm making, I reduced the hole size a little. The original had 3/16 holes, I went 5/32. The cross hole is the same at 3/32. Should be a little stronger. |
|
| |
|
Expert 5K+
Posts: 9905
Location: Lower Mainland BC | samstrader - 2020-05-05 1:12 AM
I just noticed that the ebay listing says 3 are available. This is an amazing find...
Huh. I missed that. I just re-checked the listing and yup. 3 still available. There's the non-welding answer. 
|
|
| |
|
Extreme Veteran
Posts: 445
Location: Beaumont TX | I am working on this now on my car which is a 1955 259. I don't know if it is the same as yours or not but these studs are definitely the same as I have.
The passenger side is only drilled to the cam bearing on the second from the back cam bearing. The location where these studs go in the front on the passenger side is not drilled through the head. The hole has a bottom like all the others other than the one drilled all the way through. Same for the driver side except it is drilled through on the cam bearing second from the front.
On my car, you only need one of these on each side. You can put a solid bolt in the front location on the passenger side and a solid bolt in the back location of the driver side. The main problem it seems is how to hold the valve cover on without the stud sticking all the way up
I'm not expert on these engines like you guys but on my engine, I am certain only one is drilled down to the cam bearings on each side.
The home made bolts in the picture would work perfect on my car to supply oil to the rocker assembly. The only problem would be how to hold on the valve cover. But the bolts would definitely oil the rocker just like the original style studs. And you would only need one of these on each side. |
|
| |
|
Expert 5K+
Posts: 9905
Location: Lower Mainland BC | .
A few observations:
1. The heads on these cars are the same both sides except they are rotated 180 deg from each other. As a result something that is near the back of one head will be near the front of the other head. This explains the shift in the location of the hollow stud with the oil gallery.
2. The threads on the studs in question are different top to bottom. The bottom most thread is coarse. That is the one that is screwed into the head. The middle one is the one where the nut holds the rocker shaft bracket down. The top thread is for the acorn nut that holds the valve cover to the head. The middle nut is PN 120 369 in Section 9-43-22 ; the acorn nut is 131 517 in 9-03-28. I can't tell if the threads are different but you can't put an acorn nut in the middle position anyway.
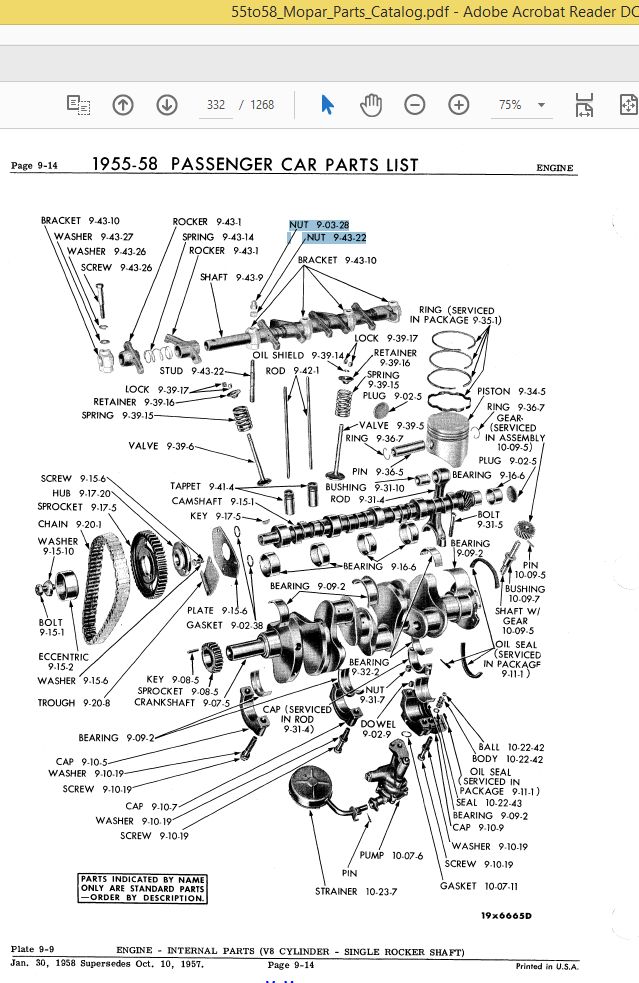 (EarlySingleRockerV8ValveTrainDiagram_ShowingSectionsForTheRockerBracketStudNuts.jpg) (EarlySingleRockerV8ValveTrainDiagram_ShowingSectionsForTheRockerBracketStudNuts.jpg)
Attachments
----------------
EarlySingleRockerV8ValveTrainDiagram_ShowingSectionsForTheRockerBracketStudNuts.jpg (131KB - 376 downloads)
|
|
| |
|
Veteran
Posts: 129
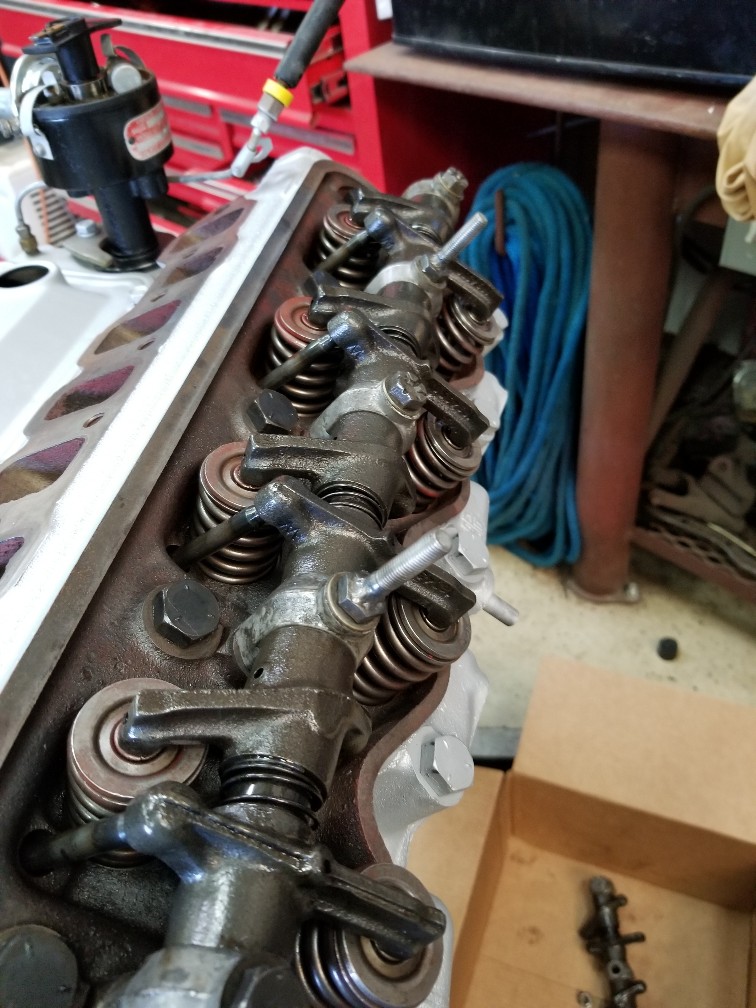
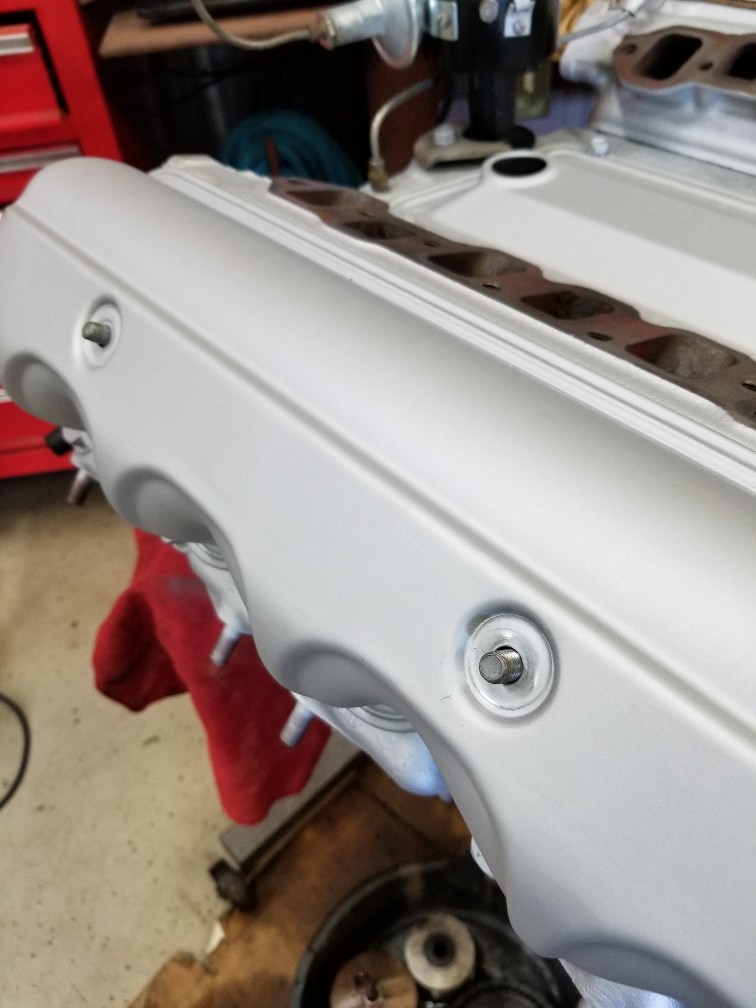
| Looks like it worked! The homemade bolts torqued with no problem, valve cover holes lined up without any adjusting. I'm happy!
 (20200505_173801_copy_756x1008.jpg) (20200505_173801_copy_756x1008.jpg)
 (20200505_174906_copy_756x1008.jpg) (20200505_174906_copy_756x1008.jpg)
 (20200505_180209_copy_756x1008.jpg) (20200505_180209_copy_756x1008.jpg)
 (20200505_180642_copy_756x1008.jpg) (20200505_180642_copy_756x1008.jpg)
Attachments
----------------
20200505_173801_copy_756x1008.jpg (178KB - 357 downloads)
20200505_174906_copy_756x1008.jpg (183KB - 365 downloads)
20200505_180209_copy_756x1008.jpg (115KB - 369 downloads)
20200505_180642_copy_756x1008.jpg (139KB - 348 downloads)
|
|
| |
|
Expert 5K+
Posts: 9905
Location: Lower Mainland BC | bbdakota - 2020-05-05 4:40 PM
Looks like it worked! The homemade bolts torqued with no problem, valve cover holes lined up without any adjusting. I'm happy!
I would be concerned that the coarse-threaded portion of your new bolt bottomed out in the head before the head of the welded-on fine thread bolt made contact with the rocker shaft bracket sufficiently to hold the bracket and the shaft in place properly (without flexing)
|
|
| |
|
Expert 5K+
Posts: 9672
Location: So. Cal | His bottom course threaded portion is much longer so there shouldn't be a problem there. You just loosen the head a little bit when you remove the rockers. But that's the same with the hemi motors too. |
|
| |
|
Expert 5K+
Posts: 9905
Location: Lower Mainland BC | Powerflite - 2020-05-06 1:30 PM
His bottom course threaded portion is much longer so there shouldn't be a problem there.
It's the distance from the bottom of the new coarse bolt to the underside of the head of the fine bolt that concerns me. Maybe it is good but maybe it's not. I would have thought that shorter threads on the coarse section would be better than longer so you know that the head on the fine bolt is firmly in contact with the top of the rocker shaft bracket, not just grazing it.
Edited by 56D500boy 2020-05-06 6:43 PM
|
|
| |
|
Veteran
Posts: 129
| You all have a good eye! The original other 3 bolts each side are 2-1/4" bolts. I bought 2-1/2" bolts. I run a thread chaser down the holes first. The hollow bolts were fine at 2-1/2" but the solid bolts went into blind holes and I did have to cut 1/4" off the ends so they would not bottom out before tightening on the rocker stands. I should have added this bit of information but didn't think anyone was all that interested in the fine details. |
|
| |
|
Expert 5K+
Posts: 9905
Location: Lower Mainland BC | bbdakota - 2020-05-06 3:39 PM
You all have a good eye! The original other 3 bolts each side are 2-1/4" bolts. I bought 2-1/2" bolts. I run a thread chaser down the holes first. The hollow bolts were fine at 2-1/2" but the solid bolts went into blind holes and I did have to cut 1/4" off the ends so they would not bottom out before tightening on the rocker stands. I should have added this bit of information but didn't think anyone was all that interested in the fine details.
Some of us (ahem) are engineers and it's all about the fine details. Those are the ones that can bite you in the @ss.
Your solution to your problem was clever and it took more than a little skill to carry out so kudos are in order. Congrats on a job well done.
I am happy (for you) that you thought it through and checked the bottoming issue and resolved it by shortening the bolt. Another or additional solution would have been a thicker washer between the bolt head and the rocker shaft bracket to effectively lift the bolt up a bit so when you torqued it down, it was against the bracket top, not the coarse thread bottom.
All good. Congrats again. Well done.
|
|
| |
|
Extreme Veteran
Posts: 445
Location: Beaumont TX | Excellent job making your own parts and your parts are stronger than the OEM stuff. Looks just like my rocker assembly except yours are amazingly clean. |
|
| |
|
Veteran
Posts: 129
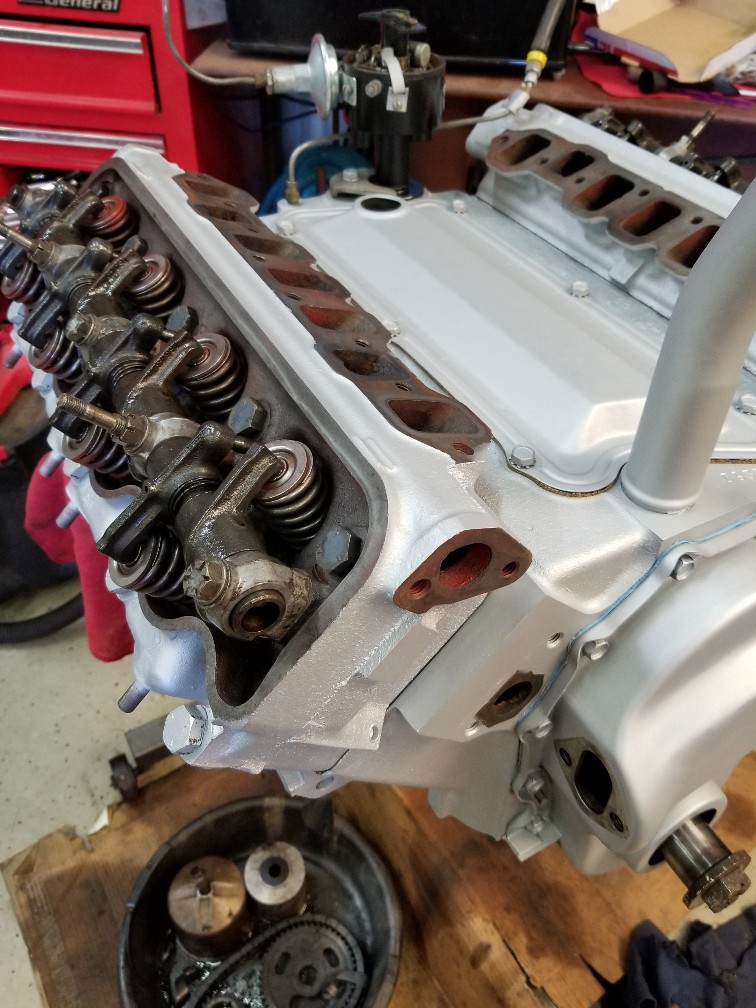
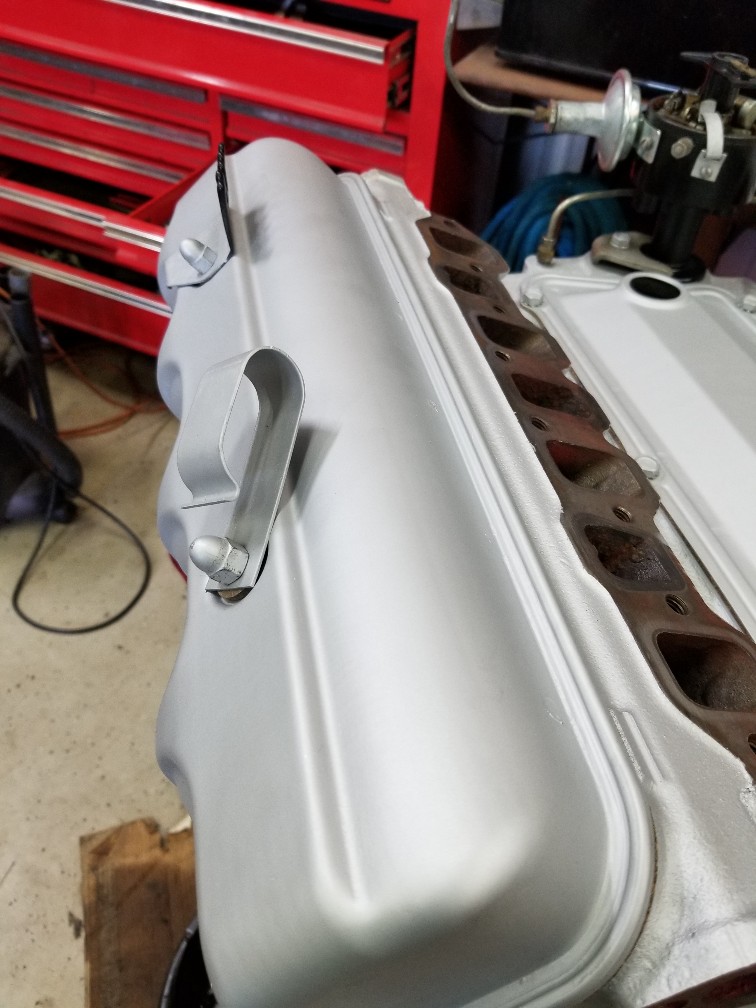
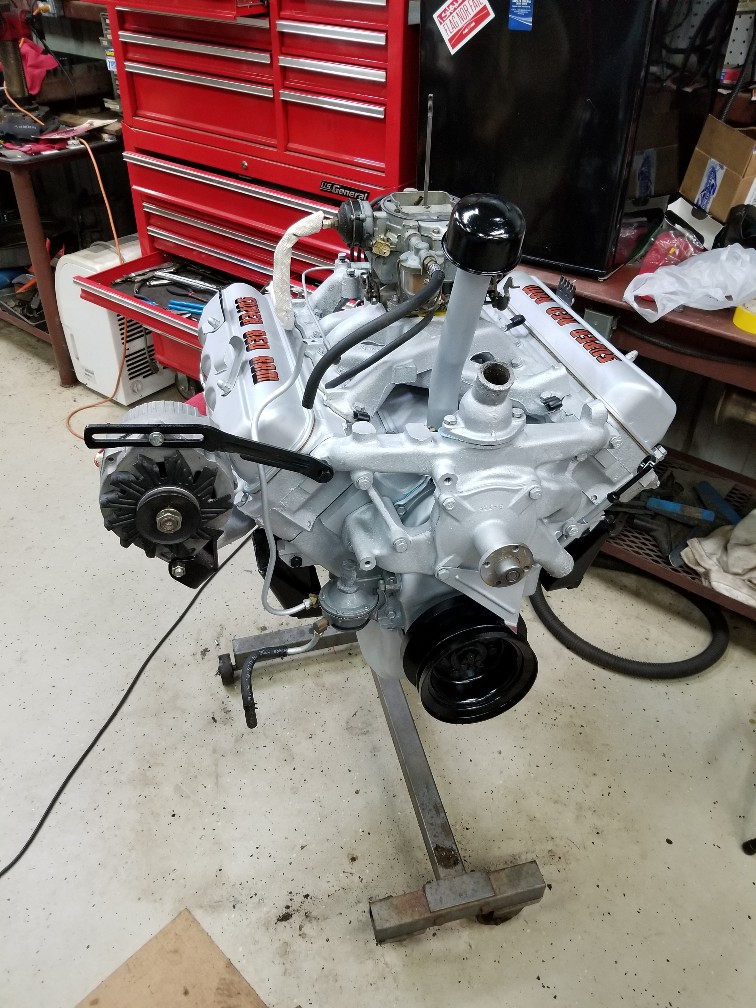
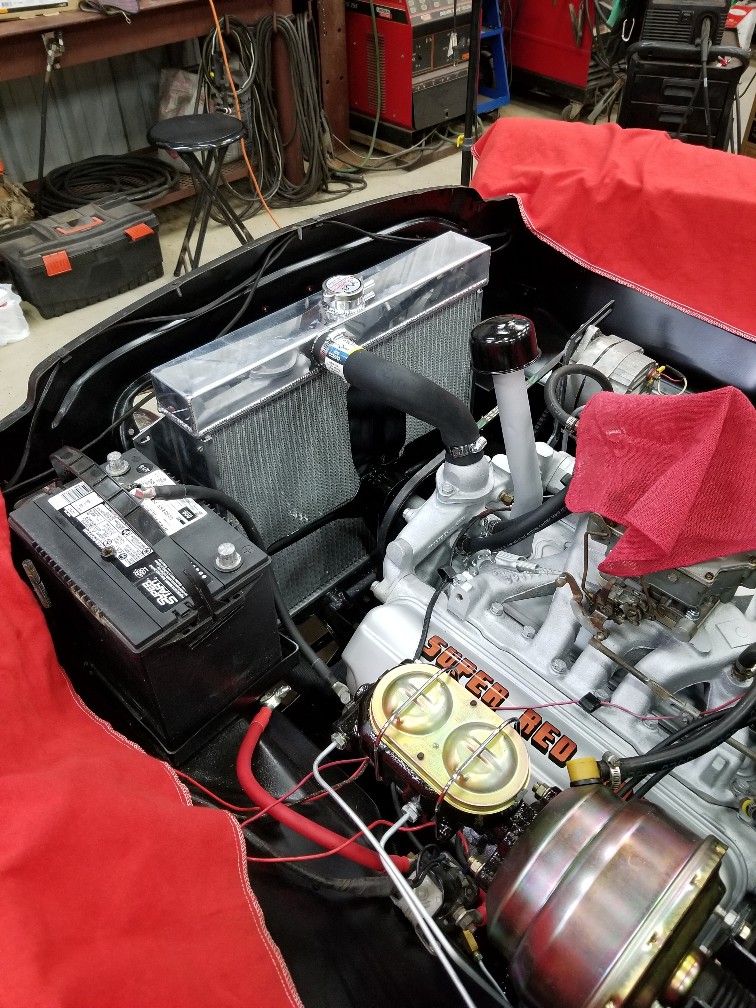
| Thanks. It's amazing what an ultrasonic cleaner with Castrol supper clean in it will do. Hope I got the shafts oriented correctly. It's about ready to drop back in the engine bay. I'm cleaning and painting the engine bay now.
 (20200515_101455_copy_756x1008.jpg) (20200515_101455_copy_756x1008.jpg)
Attachments
----------------
20200515_101455_copy_756x1008.jpg (231KB - 349 downloads)
|
|
| |
|
Expert 5K+
Posts: 9905
Location: Lower Mainland BC | bbdakota - 2020-05-15 1:12 PM
Thanks. It's amazing what an ultrasonic cleaner with Castrol supper clean in it will do. Hope I got the shafts oriented correctly. It's about ready to drop back in the engine bay. I'm cleaning and painting the engine bay now.
Looking very nice Super-Powered (4bbl) Super Red Ram there Scott.
Any chance that you could post a photo of the timing pointer with some measurements for my friend in this thread:
http://www.forwardlook.net/forums/forums/thread-view.asp?tid=73826&...
He is missing his pointer for some reason.
Edited by 56D500boy 2020-05-15 4:33 PM
|
|
| |
|
Extreme Veteran
Posts: 445
Location: Beaumont TX | BBDakota… Your rocker arm orientation looks right to me. I installed the "locating screw" on the side that was next to the intake valve on both my rockers. That is how I interpreted the picture inn the service manual. I can't see what difference it would make which hole you put the locating screw in but just tried to follow the service manual. The order of your rockers and springs is correct. I double checked the photo. Looks really good. Super clean... |
|
| |
|
Veteran
Posts: 129
| Thanks samtrader!
56d500boy, I'll get some measurements for your friend tomorrow. |
|
| |
|
Veteran
Posts: 129
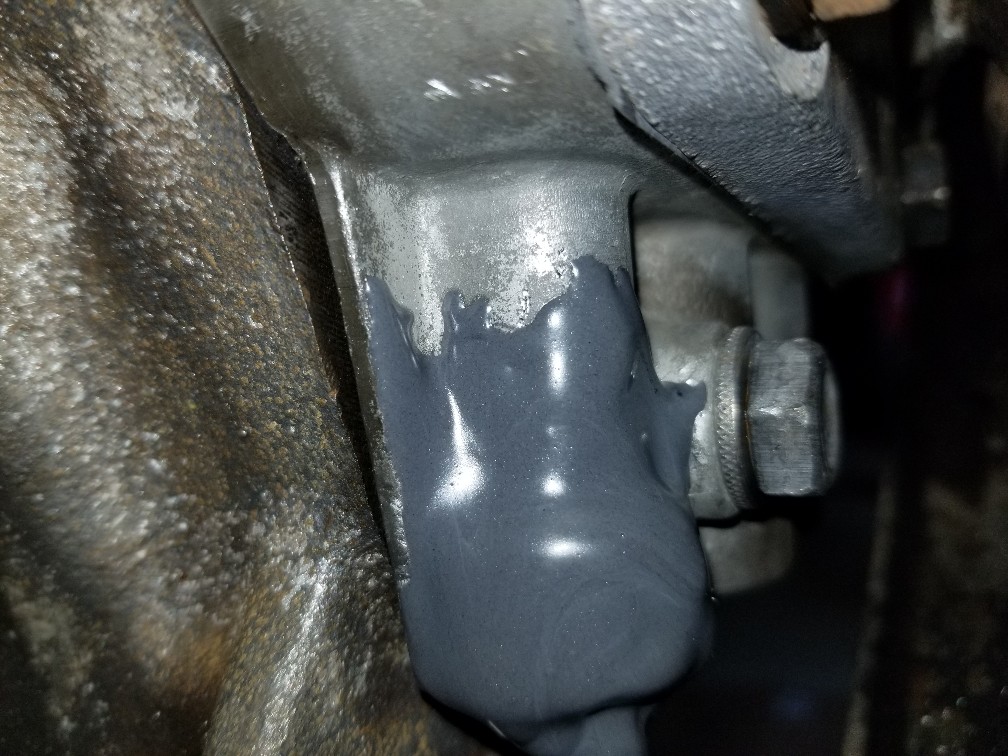
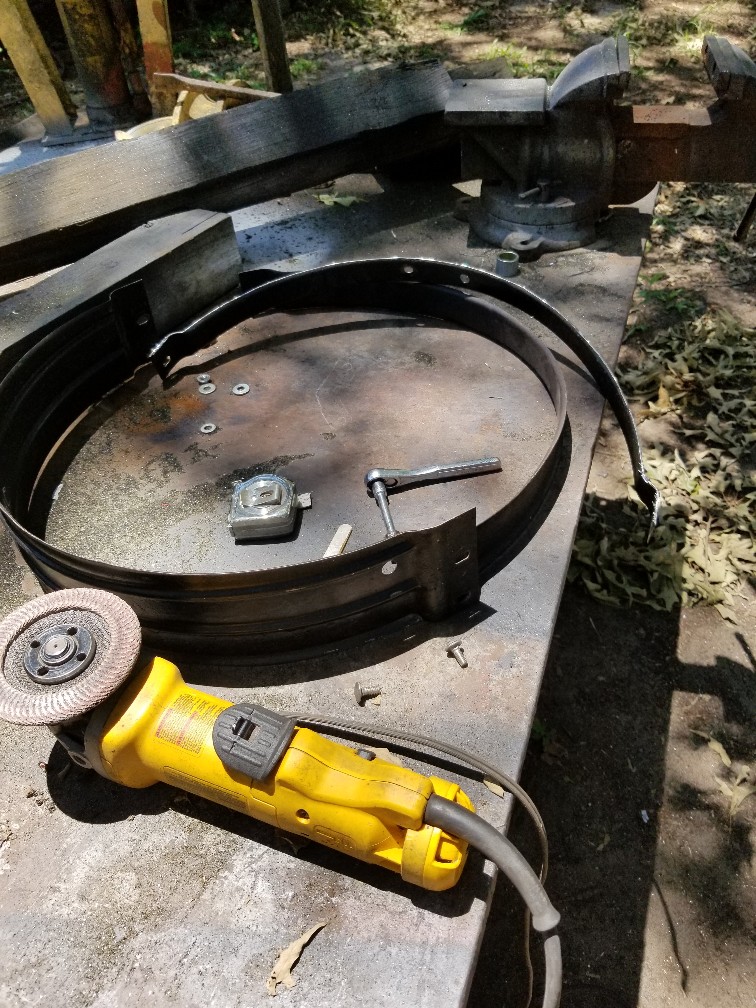
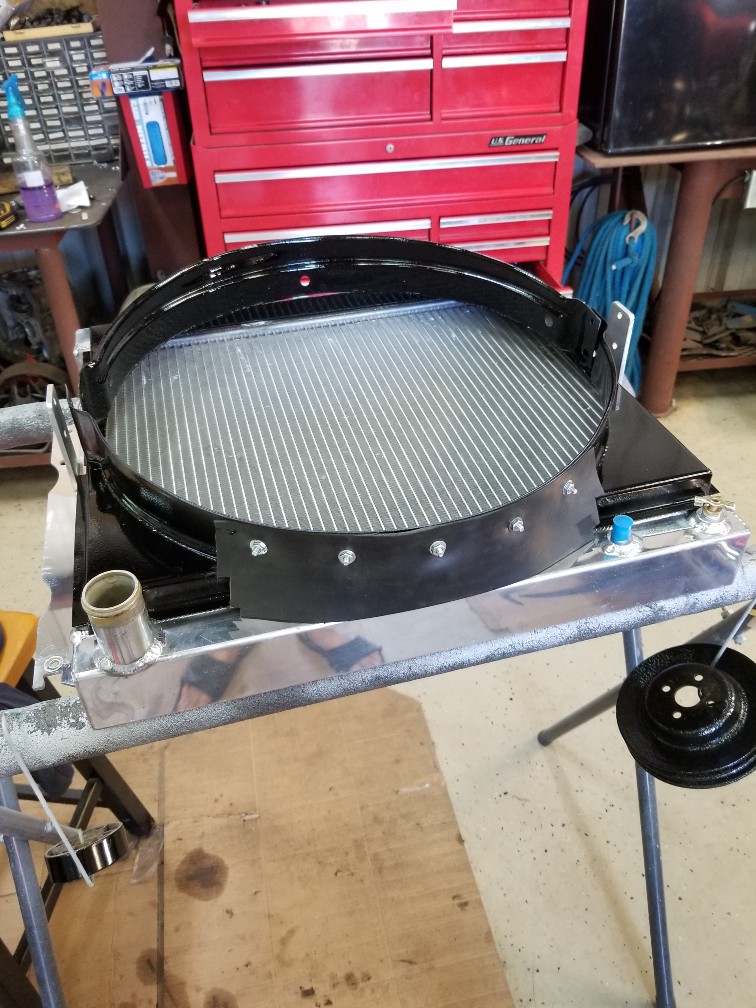
| I found my biggest transmission leak. Unfortunately the output shaft support housing is cracked. I cleaned it up, scuffed it and have jb weld on it now. Even if that stops the leak, I'm scared at some point, the jb weld will let go after so many heat cycles. Meanwhile, I'll see if I can't find a powerflite, have it rebuild and waiting to swap the transmission out. I did get the engine and transmission back in the car. Now I gotta fit the new radiator, run new exhaust and all the little bits.
Edited by bbdakota 2020-05-24 6:06 PM
 (20200524_100255_copy_1008x756.jpg) (20200524_100255_copy_1008x756.jpg)
 (20200524_151308_copy_756x1008.jpg) (20200524_151308_copy_756x1008.jpg)
Attachments
----------------
20200524_100255_copy_1008x756.jpg (191KB - 346 downloads)
20200524_151308_copy_756x1008.jpg (238KB - 383 downloads)
|
|
| |
|
Veteran
Posts: 129
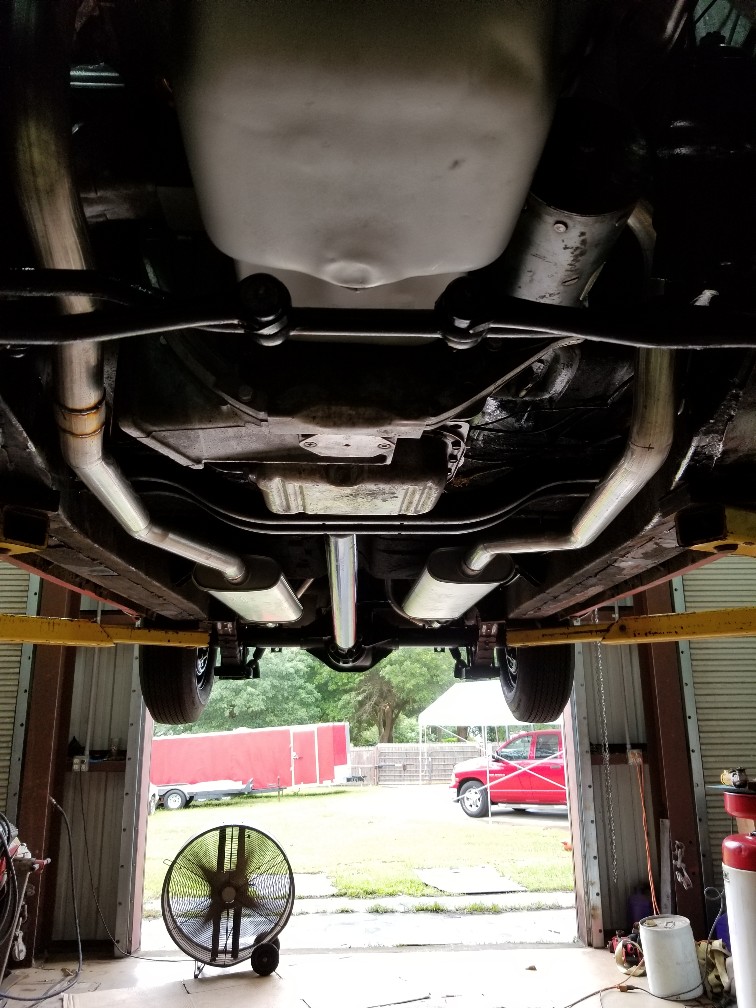
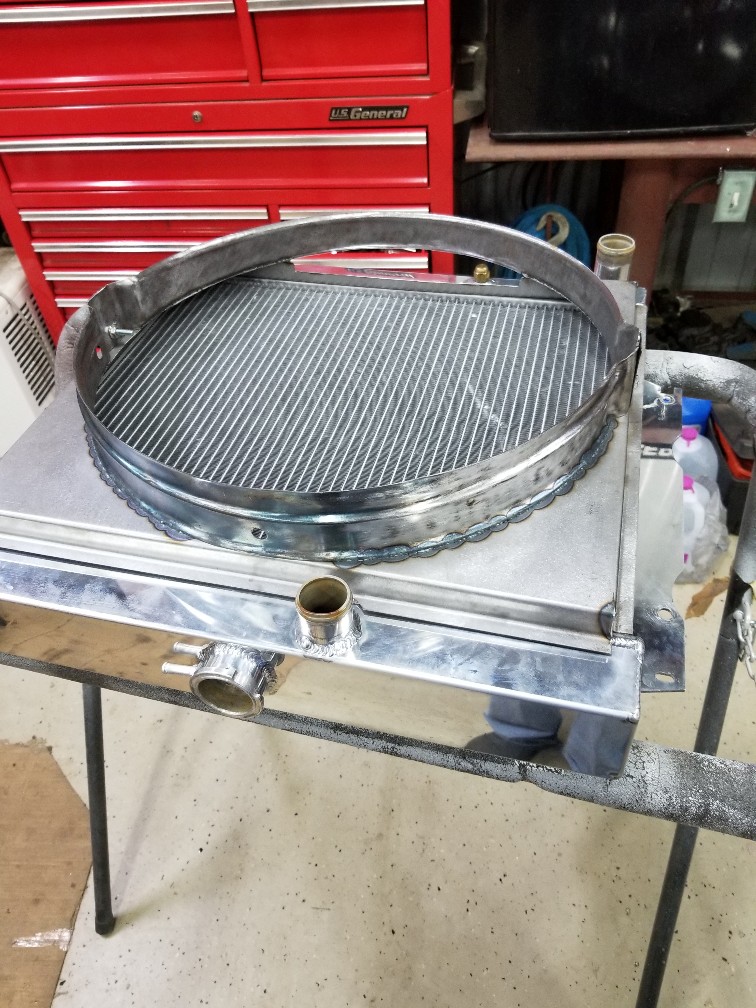
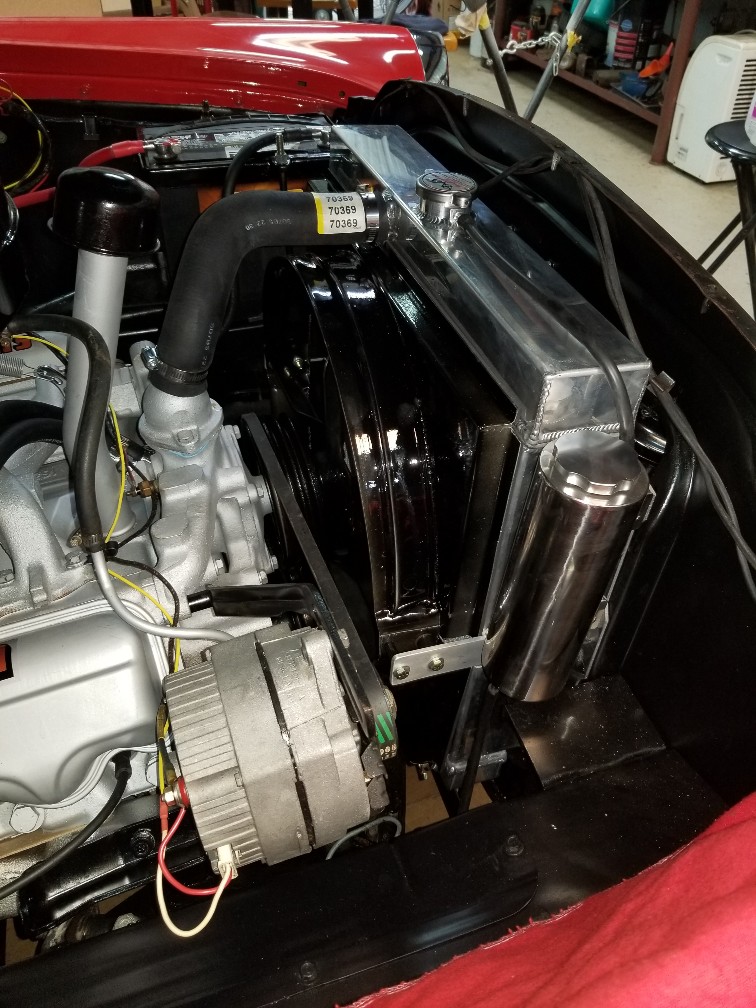
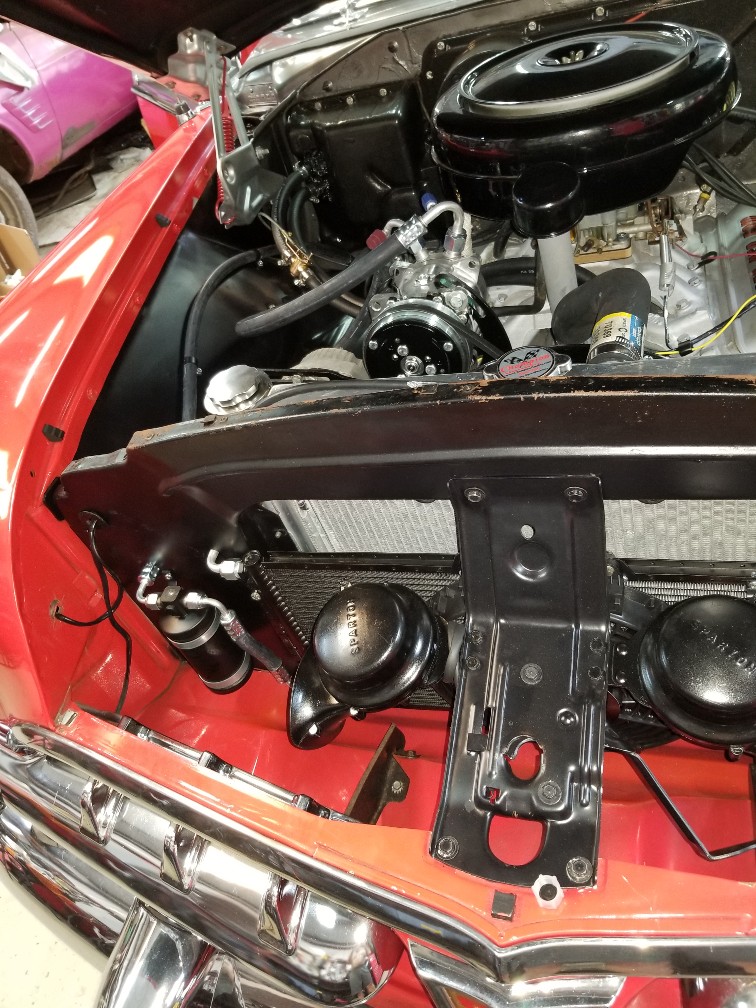
| Exhaust and radiator installed......I'll start it this weekend
 (20200528_162559_copy_756x1008.jpg) (20200528_162559_copy_756x1008.jpg)
 (20200526_165815_copy_756x1008.jpg) (20200526_165815_copy_756x1008.jpg)
Attachments
----------------
20200528_162559_copy_756x1008.jpg (262KB - 363 downloads)
20200526_165815_copy_756x1008.jpg (186KB - 355 downloads)
|
|
| |
|
Extreme Veteran
Posts: 445
Location: Beaumont TX | The engine sure looks good. Great job... Underside of the car is perfect.
Regarding the transmission leak, my daughter's 2002 Honda CRV had a crack in the bell housing engine mount. I drilled some holes to put pop rivets in and then wrapped sheet metal around the crack and packed JB weld behind the sheet metal. I doesn't move at all now. The JB Weld took out all of the slack between the bell housing base and the sheet metal and with this flex gone, it's a lot stronger. I'm not sure where your crack starts and ends and if it is a support piece or not. If the strength of the support is not compromised, seems like you could drill into the liquid holding part and push in some RTV or something to isolate the fluid from the crack from the inside. It doesn't look like there is any reason for the fluid to be in that part of the casting. Just thinking about some options to stop the leak. There is almost no pressure there so stopping the leak should be easy. A sheet metal overlay held on by drilled and tapped screws with RTV behind it should totally stop the leak it seems like to me.
Just thinking out loud.
Your engine really looks great... |
|
| |
|
Veteran
Posts: 129
| Thanks Sam.
The more I read about jb weld, the more confident I get about the repair. I got the area good and clean with brake cleaner and compressed air. Then roughed up the area with a carbide burr tip on a die grinder to give the jb weld a clean, oxidation free rough surface to bond to. Time will tell.
 (20200525_092346_copy_1008x756.jpg) (20200525_092346_copy_1008x756.jpg)
Attachments
----------------
20200525_092346_copy_1008x756.jpg (190KB - 347 downloads)
|
|
| |
|
Veteran
Posts: 129
| BTW, I've got a high frequency tig outfit, I could disable, clean, weld,retap the hole..... but I'd prefer not go through that trouble and then there's a chance I'd warp the housing..... |
|
| |
|
Veteran
Posts: 129
| Started the car, the rockers are ticking a bit. I gotta pull a valve cover and make sure they getting oil. Total run time about 20 seconds. I have oil pressure. Also have water seeping from the intake gaskets. I was a little concerned using steel gaskets without sealant. Guess I should have used sealant. So far no leaks from the transmission or no oil leaks |
|
| |
|
Veteran
Posts: 129
| Pulled the valve covers, one rocker shaft was just getting oil. Pulled it anyway and rolled it over. It's getting oil. I took a pump oiller and filled the shaft with oil. Pulled one bolt one the other side and filled the shaft with oil. I was just impatient I guess but if I ever do this again, I'll fill the shafts with oil.
I do still have a lifter tapping that was quite before but could be because the plungeris not exactly operating in the same position as before. I measured the old head gaskets and the new head gaskets and had the machine shop surface the heads by that amount. .025". But there was 9 rockers I had resurfaced so some lifters are not operating in the same range as before. |
|
| |
|
Veteran
Posts: 129
| Well I run it thru a full heat cycle and the lifter tap is so faint now someone would have to be listening for it. Also the water leaks around the intake are not much of anything, not enough to form a run and not much of a drop. This is with the coolant system pressurized. I think I'll run it a bit and keep an eye on it. |
|
| |
|
Extreme Veteran
Posts: 445
Location: Beaumont TX | The JB Weld repair looks great. Since you cleaned and roughed up the surface so well, I'll bet it will work like a champ. It looks great.
I also just read your thread about the rocker shaft not being full of oil. I'm going to change my driver side shaft next week and I'll fill the shaft with oil just like you said. I pulled and cleaned both of my shafts last month and just ran the engine until they filled up from the engine running. Since I had oiled everything before, I didn't hear too much tapping but it got quieter after it got oiled up. I think you were worried about running for 20 seconds without oil but I don't think you need to worry. My engine had the cam bearing that supplies oil to the driver side rockers installed wrong and I drove the car for more than 500 miles without a drop of oil to the rockers. The damage was two intake rockers messed up and three push rods messed up. The shaft was OK. Less damage than you would think. I replaced the two bad intake rockers with NOS rockers I got off of ebay. I have the small tapping like you and am hoping that when I change the push rods that the tapping will stop. I'll definitely fill up the shaft with oil before starting this time. Very good idea. |
|
| |
|
Extreme Veteran
Posts: 445
Location: Beaumont TX | Regarding your water leak on the intake manifold. I don't know if the same as mine but on mine the two middle bolts on each side that hold the intake manifold down, you have to us a thread sealant on these bolts because bolt holes are drilled into the water jacket. The first time I installed, I didn't seal the threads and it leaked very slightly and made an ugly spot. This last install, I put Permatex Black RTV gasket maker on the threads and torqued them down and there is no leaking at all. The RTV works real good for sealing the threads. This would be easy to do if you think it is what is needed on yours. Just have to lower the water level in the radiator some and install RTV on the threads one bolt at a time. On mine, I also cleaned the threads in the block and bolts with a tap and die and degreased them with brake parts cleaner before installing the RTV (put RTV on bolts only, not in the bolt hole). There are two bolts on each side that need to have the threads sealed. Counting from the end of the head, it's bolts 4 and 5.
May not be the same as yours but this is how mine worked. |
|
| |
|
Veteran
Posts: 129
| Thanks Sam. I did put sealant on the threads of those bolts. Looks like the leak is due to the embossed steel type gaskets and a 60 year old not so perfect surface. I ordered some gaskets but I'm still hopeful it will seal on its own.
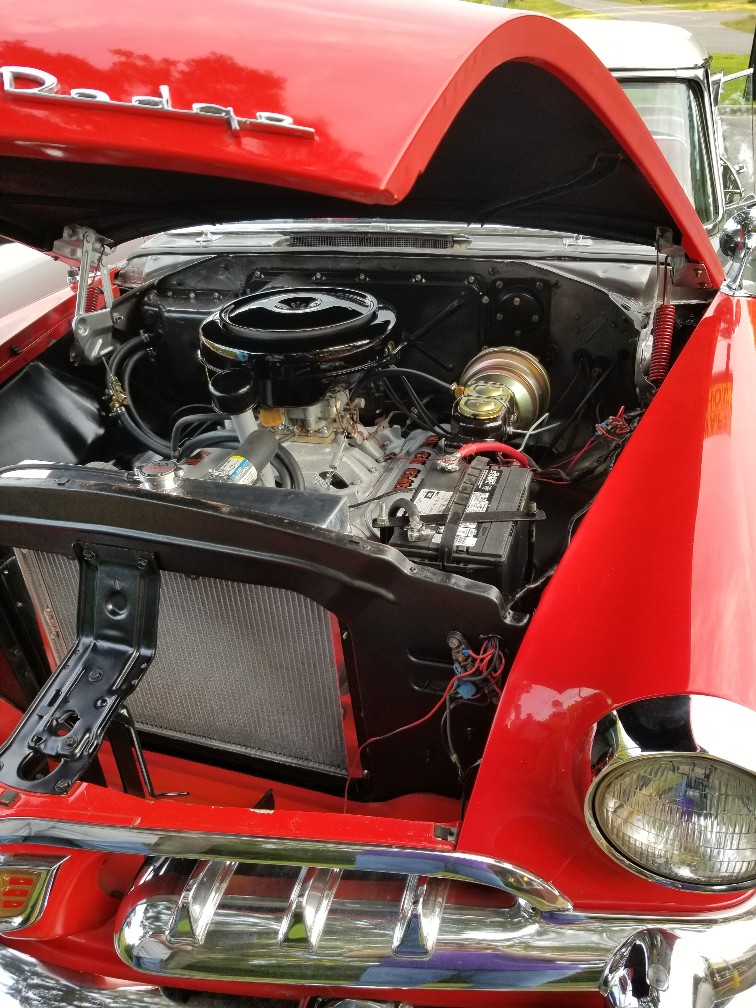
No leaks from the transmission or engine (oil)! No puff of smoke upon startup! No freeze plug leaks! I'm happy! Took the car down the road without a hood just to make sure the transmission shifted. I did have some trouble getting the cable adjustment right but it's good now.
Oh, and the lifter noise is gone!
Next I'll clean and paint the hood hinges, hood latch and horns and bottom side of the hood.
BTW, before I took the engine and transmission out, we took the car to a show about an hour away. The engine got hot (not over heated) but it started acting like it was vapor locking. When we got to the show, the fuel was bubbling (maybe boiling just a bit) in the glass fuel bowl just as it enters the carb. So I ordered one of them isolation type spacers and installed during this time. It is amazing how much cooler the carb is compared to the intake! I highly recommend if anyone is suffering from vaper lock!
I had other things fighting my ability to disperse heat, the water jackets was full of what reminded me of mud. Could have been stop leak. It was capped up behind the freeze plugs and no doubt contributed to the freeze plugs deteriorating. That's another reason I put a new aluminum radiator in it. If that was stop leak, what did the inside of the radiator look like? Plus, a modern aluminum radiator is more efficient anyway and I'll be adding ac so I probably needed to upgrade the radiator. |
|
| |
|
Extreme Veteran
Posts: 445
Location: Beaumont TX | I'm sure glad it is running so well and that the lifter noise is gone completely. (This gives me more hope on my lifter noise)...I got a new intake manifold gasket from Hot Heads the last time I installed my intake manifold and it was just a Garlock type material. Zero metal. It worked good but I did wonder why no metal now. I think it was a Best Gasket.
I have one of those insulator gaskets on my carburetor and didn't realize what it was for. One thing I did that helped my car run more balanced and cooler was to wire open the exhaust valve on the Passenger side manifold. Mine valve did move but put too much exhaust up to the Carburetor and over to the driver side. With it wired open, my paint on the intake manifold is not burning up and the engine has a more balanced run. The engine also runs cooler. I don't know if all is related to the valve being wired open but everything happened for the better after I wired it open.
I'm glad you engine is running so good. I have a rear main seal leak. How did you install your rear main seal so you don't have a leak. That's been an ongoing problem for me. I must not have done something correct on mine when I installed it.
Glad your engine is running so good...
|
|
| |
|
Veteran
Posts: 129
| I didn't do anything special on the rear main seal. The one that came in my gasket kit was rubber vs the old rope seal I took out. I did clean the mating surface of the rear main cap good and apply a thin film of rtv but I always do that on a rear cap that houses the seal.
My heat riser is stuck open so I'm good there. I'm probably going to have to pull the intake but not yet.... I'm gonna watch it for the time being.
I did read and keep up with your rocker oiling issue, glad you got that straight....I can imagine you was not very happy. |
|
| |
|
Extreme Veteran
Posts: 445
Location: Beaumont TX | Hi BBdakota,
I installed the used rocker assembly I bought today. Actually I used the parts from the one I bought and the parts from the one I had and made the best one I could and it was a lot better than what I had. I filled the shaft with oil like you said and my rockers are a lot quieter now. Filling the shaft with oil worked real good. I just left the center bolt out and used a syringe to add oil. It held a lot of oil. I can still hear some very faint tapping but it is very much better than before. I have not driven it around yet so maybe when I do that it will get quieter just like yours did. I'm finally about to get this whole rocker assembly problem behind me. See how smart you were to install your own cam bearings!!!!
Regarding the rear main seal, I did not use any RTV on the main cap and that might be my problem. I think I can change the seal with the engine in the car just by pulling the oil pan and I may do that later. Can you tell me if your crank shaft still has those angled groves in it that help push the oil away from the rope seal. I still have those groves in my crank shaft in the seal area and I'm wondering if I should have turned them out and polished the shaft before I installed the rubber seal in order to get a better seal. If you still have the groves and no leaks, then it means I just need to install the RTV and that would be great news for me. Maybe all I need to do is pull the cap and add the RTV and put it all back together. That would be pretty easy.
Thanks.
Sam |
|
| |
|
Veteran
Posts: 129
| Hi Sam.
I believe you rocker will quieten down....at least based on my experience.
I didn't tear into my short block so no I never removed my cam. The engine ran great, held good oil pressure and looking at the main bearing of the rear cap, it looked perfect.
I do still have the angled groves in my crank. I've installed other seals with those groves also and never had a problem.
It'd be a good idea to check the orientation of the seal halves when you pull the pan to make sure you didn't get twisted around and install one or both backwards...seams I read where you was double checking the orientation and know what you are doing, but I've gotten twisted around myself so put your eye on it again... also, the rtv will not stick/seal to an oily surface and it will be a challenge to get and keep the surface clean with the engine in the car, but it can be done, just don't get frustrated and install on an oily surface. Put just a smear of rtv where the seal halves butt to one another. |
|
| |
|
Extreme Veteran
Posts: 445
Location: Beaumont TX | Thanks so much BBDakota. This information really helps me out. And I know EXACTLY what you mean about getting turned around and backwards on things. I've done that so many times that now I know to double and triple check myself and even with all of this extra checking, I still get backwards.
I'm real happy to know how you installed your seal. This is extremely valuable information to me and now I think I know how to fix mine and I think I can do it by just pulling the oil pan, which is not such a hard job. Before I do this job, I may contact you again for some more counselling.... Thanks.... |
|
| |
|
Expert 5K+
Posts: 9905
Location: Lower Mainland BC | samstrader - 2020-06-02 10:38 AM I think I can do it by just pulling the oil pan, which is not such a hard job.
I hope that you are right (for your vehicle) Sam because I understand that to pull the pan on 56 Dodge V8 the engine has to be lifted (not necessarily out but still lifted) which is a big can of worms that I am not interested in opening at the moment. Even though I have a slight but annoying rear seal leak.
Good luck to you when/if you tackle that job on your car.
|
|
| |
|
Extreme Veteran
Posts: 445
Location: Beaumont TX | I pulled my oil pan back in 2011 and that's when I found my main bearings bad. On mine, you have to drop some of the steering linkage and then it comes right down very easy. I might have had to pull the starter too but don't remember. I don't remember having to jack up the engine at all. Once the steering linkage is dropped down, it's almost a wide open drop for the oil pan. The main problem for me is working on my back on the garage floor under a car. I'm getting too old for that.
I've been thinking about this seal leak and am wondering if I can just add RTV to the seal ends and bearing cap and close it back up without replacing the seal. That would be real easy.
I've had some misfortunes on my engine but I sure have learned a lot about these engines and engines in general. I believe I could do a real good engine rebuild now as long as I got good machining and good parts. Getting good parts is not so easy any more I think.
But getting good help and good advice on this site is extremely valuable. It makes all the difference. |
|
| |
|
Veteran
Posts: 129
| I've been thinking about this seal leak and am wondering if I can just add RTV to the seal ends and bearing cap and close it back up without replacing the seal.
The chemicals you use to get it clean enough might not be good for the rubber. you can easily push a rubber seal out of the block side, I'd replace it if you go through enough trouble to get to it. |
|
| |
|
Veteran
Posts: 129
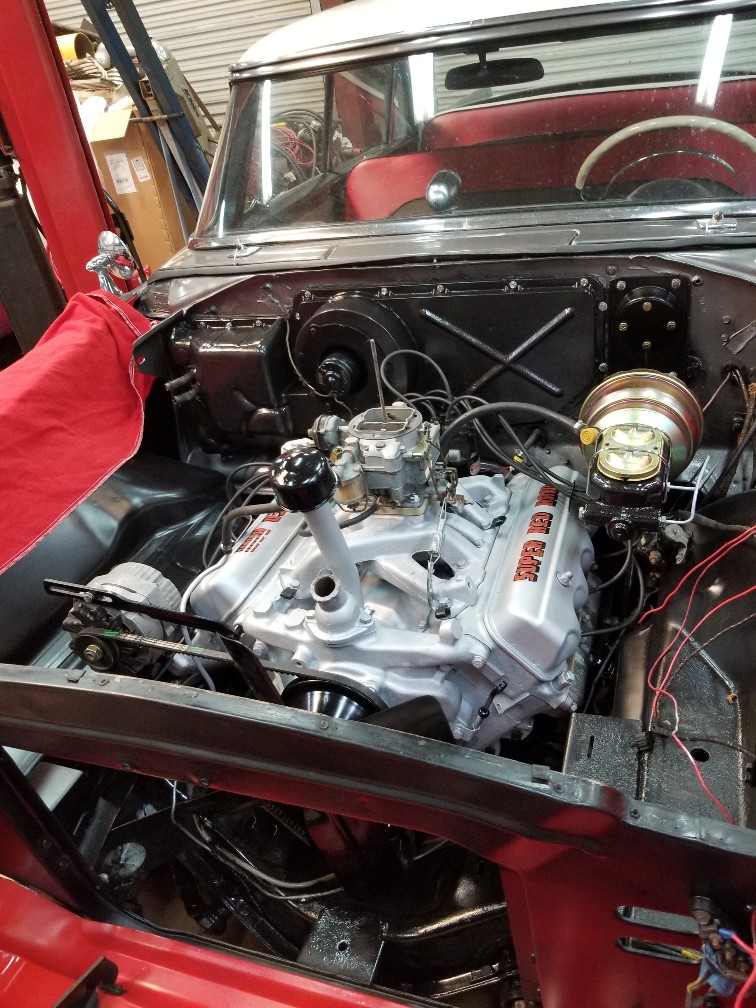
| I got everything put back on the car except the horns, the wife and I took the car out to get something to eat then a hour or so ride around the bayou.... It lost power to the coil for a spit second once and back fired when it got power again.....I'm guessing that's what happened. I couldn't get it to repeat no matter what I did.... Anyway, the intake has stopped leaking.... this thing doesn't leak a drop of anything! A far cry from where I started. Next project will be underdash ac. I'll add a fan shroud at that time. The plan is to run a multi groove water pump pulley and run the compressor from a groove on the water pump. I'll also add a cooler to the transmission since cruisin the coast could be a lot of creeping traffic in the heat.
 (20200605_185823_copy_756x1008.jpg) (20200605_185823_copy_756x1008.jpg)
Attachments
----------------
20200605_185823_copy_756x1008.jpg (229KB - 376 downloads)
|
|
| |
|
Veteran
Posts: 129
| Oh, and lake pipes! I'm gonna put some lake pipes on her! |
|
| |
|
Expert 5K+
Posts: 9905
Location: Lower Mainland BC | bbdakota - 2020-06-06 1:31 PM I'll also add a cooler to the transmission since cruising the coast could be a lot of creeping traffic in the heat.
Scott: Looking good.
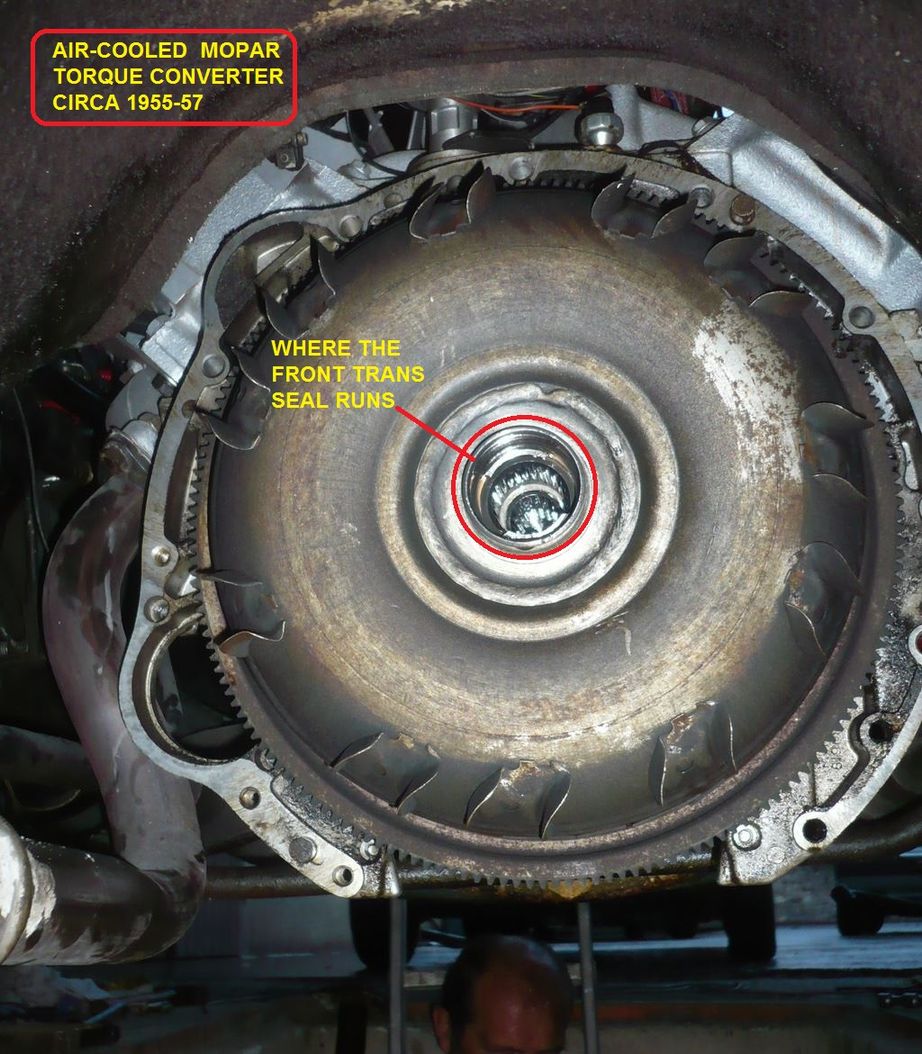
Have to warn you that you might have a challenge on your hands because your Powerflite is currently air-cooled (fins on the torque converter) and there are no ports on the transmission to run the transmission fluid forward to an auxiliary air to fluid cooler. Not saying that you won't be able to do it, just that it will be a challenge, not a slam dunk. (There were liquid-cooled Powerflites in some of the big 55-56 Chryslers and Imperials, just not the Dodges, etc)
The first photo shows the lack of ports, the second, an air-cooled torque converter.

Edited by 56D500boy 2020-06-06 8:24 PM
|
|
| |
|
Veteran
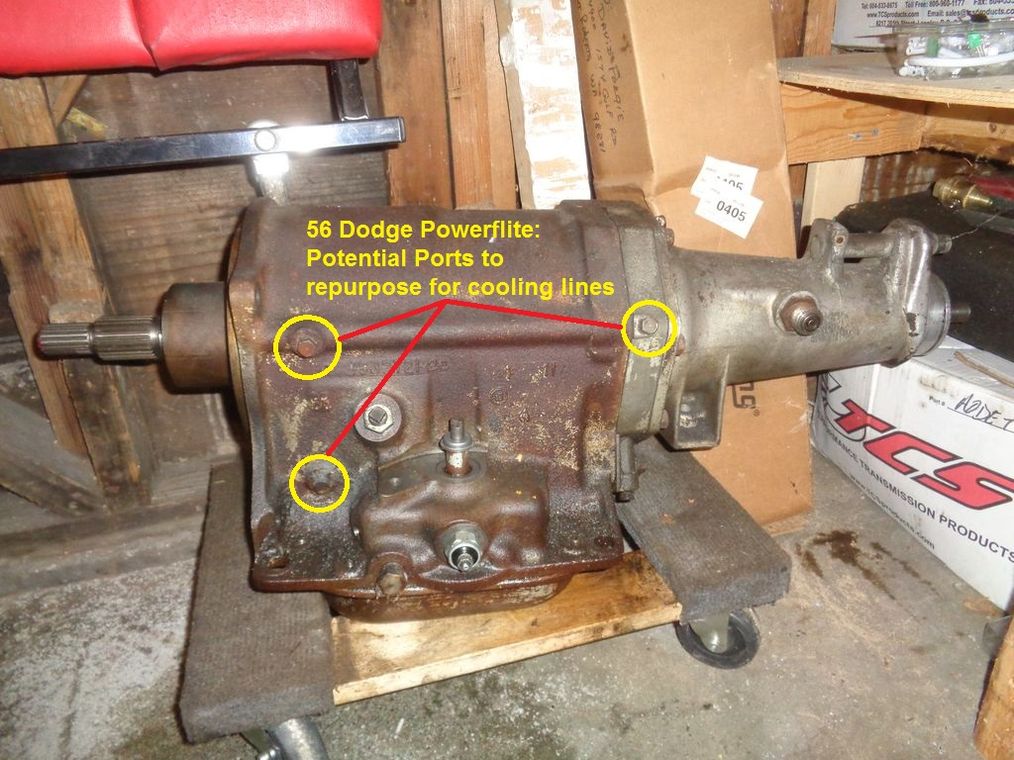
Posts: 129
| Shouldn't be hard to install a cooler, remove the 1/8th inch plugs, install fittings and plumb some steel tubing lines to the front of the engine. Then rubber lines to the cooler. I ordered 3/8" steel line, only because I have a bender for 3/8 and the cooler has 3/8" fittings. I could have gotten away with 5/16"... |
|
| |
|
Veteran
Posts: 129
| The transmission does have the ports, they have 1/8th inch pipe plugs in them now |
|
| |
|
Expert 5K+
Posts: 9905
Location: Lower Mainland BC | bbdakota - 2020-06-06 6:21 PM
The transmission does have the ports, they have 1/8th inch pipe plugs in them now
bbdakota - 2020-06-06 6:20 PMShouldn't be hard to install a cooler, remove the 1/8th inch plugs, install fittings and plumb some steel tubing lines to the front of the engine. Then rubber lines to the cooler. I ordered 3/8" steel line, only because I have a bender for 3/8 and the cooler has 3/8" fittings. I could have gotten away with 5/16"...
Wow. You got very lucky. Plumb away!!
If you happen to get a chance, it would be interesting to see a photo of the location of the ports and also if there is a stamped P/N on the flat machined surface by the trans fluid pan, by the filling tube. I wonder whether the P/N might be 1636 237 or maybe 1676 190.
|
|
| |
|
Expert 5K+
Posts: 9905
Location: Lower Mainland BC | bbdakota - 2020-06-06 6:21 PM
The transmission does have the ports, they have 1/8th inch pipe plugs in them now
bbdakota - 2020-06-06 6:20 PMShouldn't be hard to install a cooler, remove the 1/8th inch plugs, install fittings and plumb some steel tubing lines to the front of the engine. Then rubber lines to the cooler. I ordered 3/8" steel line, only because I have a bender for 3/8 and the cooler has 3/8" fittings. I could have gotten away with 5/16"...
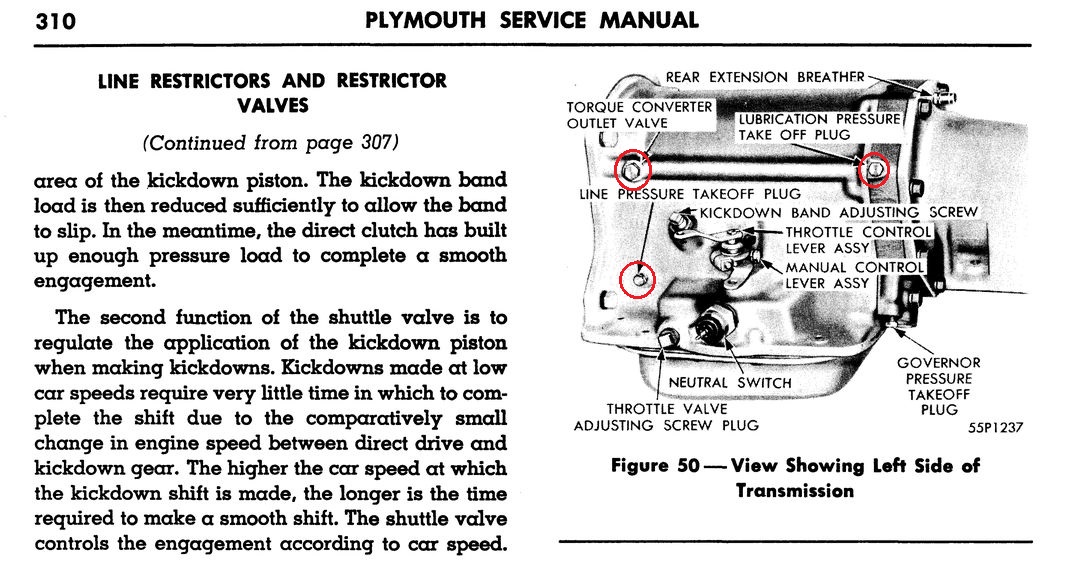
Hmm...are you talking these (below)? I'm not sure if any of them will provide the fluid flow that you need for an external trans cooler. They are there for a reason and I don't know if you can repurpose them for your needs.
Edited by 56D500boy 2020-06-07 5:13 PM
 (56DodgePowerFlite_LeftSide_Annotated.jpg) (56DodgePowerFlite_LeftSide_Annotated.jpg)
 (PowerfliteLeftSideDiagram_Annotated.jpg) (PowerfliteLeftSideDiagram_Annotated.jpg)
Attachments
----------------
56DodgePowerFlite_LeftSide_Annotated.jpg (163KB - 359 downloads)
PowerfliteLeftSideDiagram_Annotated.jpg (230KB - 372 downloads)
|
|
| |
|
Veteran
Posts: 129
| Yes, the torque converter outlet valve plug and the lubrication pressure takeoff plug are the 2 ports I plan to install the cooler to. As I understand, that's the 2 ports used on later models for a factory cooler. Do you know a reason this would be incorrect? |
|
| |
|
Veteran
Posts: 129
| Next time I get the car on the lift, I'll get the numbers off the powerflite |
|
| |
|
Expert 5K+
Posts: 9905
Location: Lower Mainland BC | bbdakota - 2020-06-07 2:30 PM
Yes, the torque converter outlet valve plug and the lubrication pressure takeoff plug are the 2 ports I plan to install the cooler to. As I understand, that's the 2 ports used on later models for a factory cooler. Do you know a reason this would be incorrect?
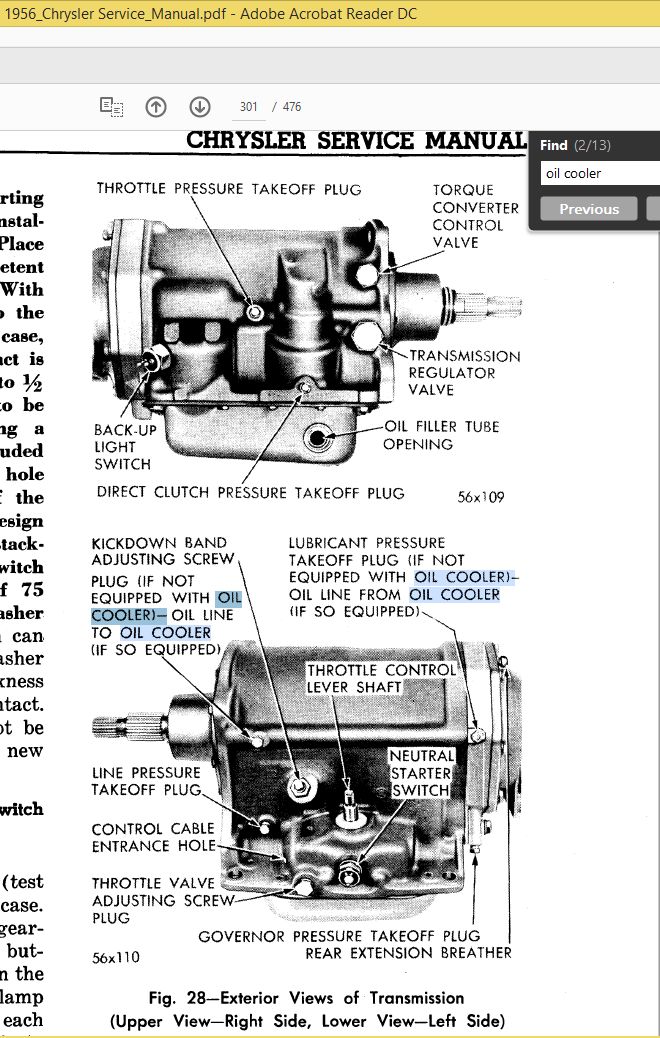
I just checked the 1956 Chrysler Factory Service Manual because I know that some of the senior Chryslers got oil coolers for their Powerflites. The diagram below confirms that ports that you were going to use are the same ones that the factory used to run lines to the cooler. Now I have to check the 1957 Chrysler Torqueflite diagrams to see if it would be that easy to install an external oil cooler on an air-cooled A-466 Cast Iron Torqueflite. I don't think it is. EDIT: It isn't
I think you are good to go (or at least try it)
Edited by 56D500boy 2020-06-07 11:31 PM
 (56ChryslerPowerFliteDiagramsShowingPortsForTransOilCoolerConnections.jpg) (56ChryslerPowerFliteDiagramsShowingPortsForTransOilCoolerConnections.jpg)
Attachments
----------------
56ChryslerPowerFliteDiagramsShowingPortsForTransOilCoolerConnections.jpg (160KB - 381 downloads)
|
|
| |
|
Extreme Veteran
Posts: 445
Location: Beaumont TX | Thanks for the help on the Rear Main Seal BBDakota. I'll put a new seal like you recommend. I'm glad it's easy to push out and it would just be safer to do it that way. I'm glad I have a good chance to make the seal leak stop. Thank you and everyone for all the help with this. Just very valuable advice that helps me out a lot.
The chemicals you use to get it clean enough might not be good for the rubber. you can easily push a rubber seal out of the block side, I'd replace it if you go through enough trouble to get to it |
|
| |
|
Extreme Veteran
Posts: 445
Location: Beaumont TX | Just studied the picture of your engine bbdakota. It sure looks great. Whole engine compartment looks great. I'm glad no leaks of any kind at all. And great that the intake manifold took up too. I've been reading all of your automatic transmission stuff and I'm glad I have a 3 speed manual. It leaks a little but it's pretty easy to fix. Your car is beautiful... |
|
| |
|
Veteran
Posts: 129
| Thanks 56D500boy and thanks Sam. It took many hours of cleaning, stripping paint and grime then tape and paint but I'm happy with it. I welded up unused holes in the inter fenders while I had the chance also. |
|
| |
|
Veteran
Posts: 129
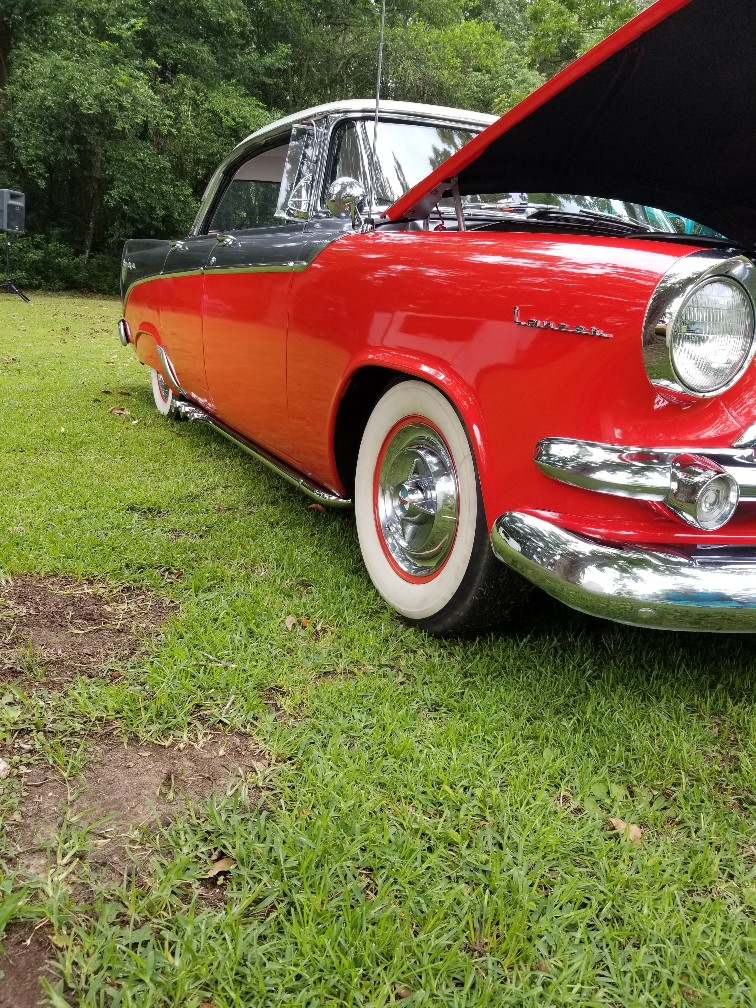
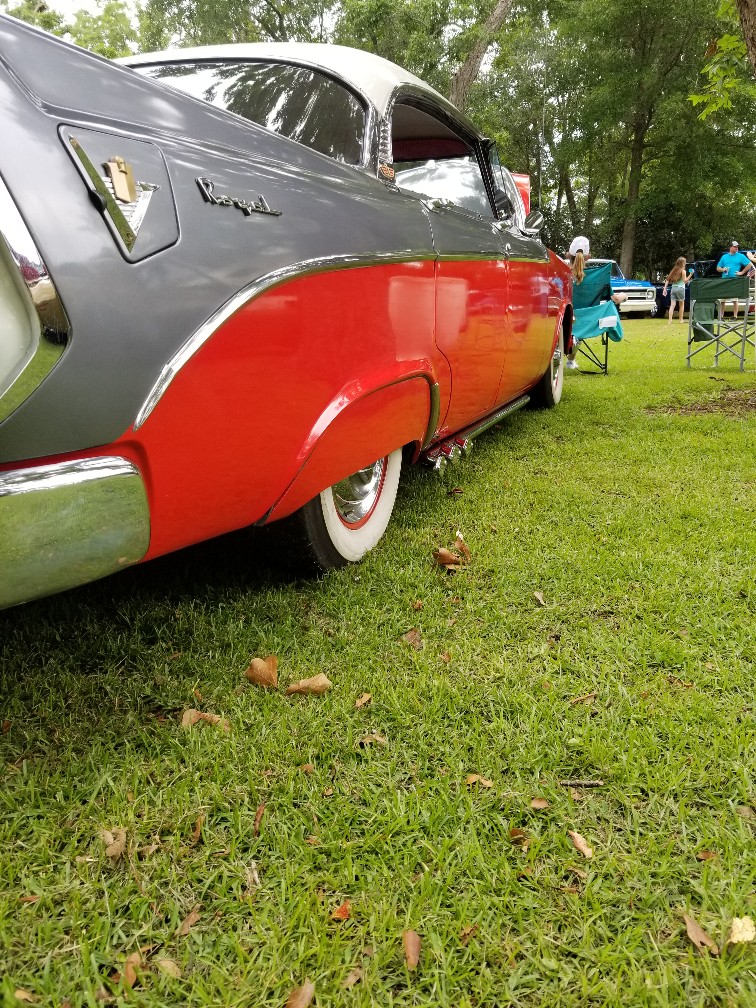
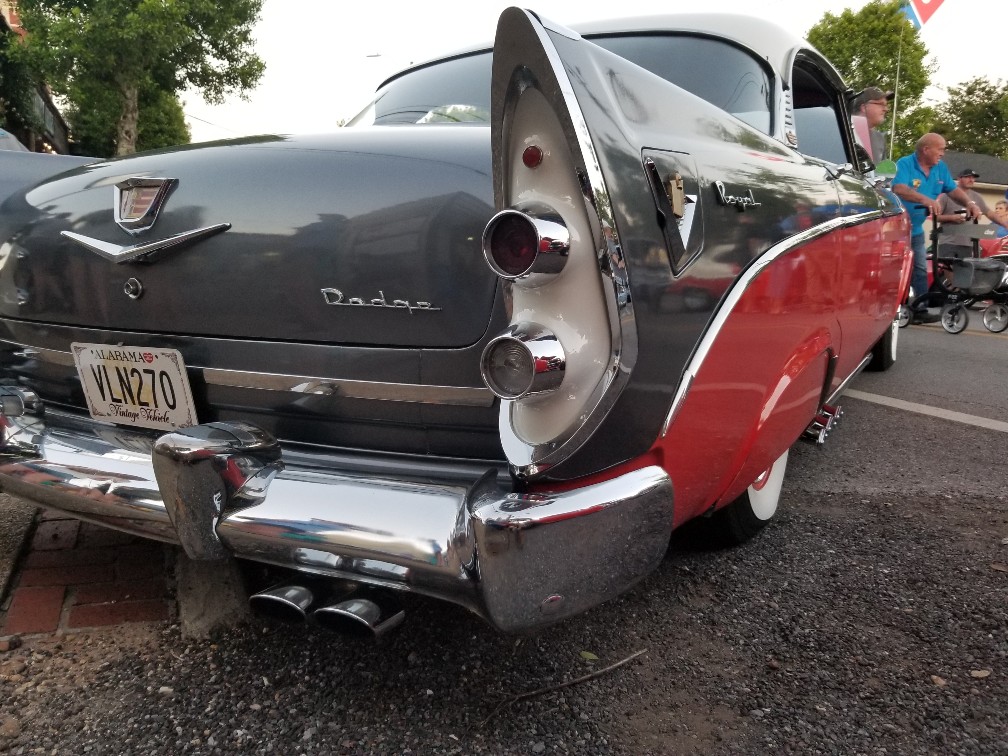
| I took her to her first cruise in since getting her all back together. Most everyone said something to the effect of "you don't see many of these around ". One guy that looked over the car returned in about an hour and said "I've looked at every car here now and this is my favorite "
I've got the ac ordered, I'm trying to figure out how I want to build the fan shroud and still have it look period correct. Here's some pictures from the cruise in.
 (FB_IMG_1592130579329.jpg) (FB_IMG_1592130579329.jpg)
 (FB_IMG_1592130552840.jpg) (FB_IMG_1592130552840.jpg)
Attachments
----------------
FB_IMG_1592130579329.jpg (127KB - 366 downloads)
FB_IMG_1592130552840.jpg (165KB - 380 downloads)
|
|
| |
|
Extreme Veteran
Posts: 445
Location: Beaumont TX | My 1955 Plymouth has a fan shroud. But it is only 1/2 way around from the top. Not sure how to make it fit and attach to an aluminum radiator. Wouldn't look right for the time period but an electric pusher fan in front of the condenser may be a good option. They sure work better when the car is at an idle. |
|
| |
|
Member
Posts: 8
| Very Nice! We have a 4 door hardtop as well, very similar with the 315 Poly.
 (Lucille.jpg) (Lucille.jpg)
Attachments
----------------
Lucille.jpg (307KB - 370 downloads)
|
|
| |
|
Veteran
Posts: 129
| Nice Ryan! I'd love to see more pictures of your car! What area do you live in? |
|
| |
|
Veteran
Posts: 129
| Fan shroud made! Although I'm not comfortable with the clearance to the fan. I ordered a 6 blade 18" fan but the adapter to adapt the pilot hole from 1-1/8" to 5/8" was on back order. The 4 blade fan on my car is 18-1/4". Either the fan or shroud must not be original because the shroud only had about 1/4" clearance when bolted to the center of the slotted holes. I cut the shroud in half, made a simple pan and welded them together.
I did put the car in gear, both fwd and reverse, held the brake and leaned on the throttle. Fan didn't hit.
 (20200618_115349_copy_756x1008.jpg) (20200618_115349_copy_756x1008.jpg)
 (20200618_194739_copy_756x1008.jpg) (20200618_194739_copy_756x1008.jpg)
 (20200619_141818_copy_756x1008.jpg) (20200619_141818_copy_756x1008.jpg)
 (20200619_160306_copy_756x1008.jpg) (20200619_160306_copy_756x1008.jpg)
Attachments
----------------
20200618_115349_copy_756x1008.jpg (272KB - 362 downloads)
20200618_194739_copy_756x1008.jpg (224KB - 371 downloads)
20200619_141818_copy_756x1008.jpg (214KB - 370 downloads)
20200619_160306_copy_756x1008.jpg (209KB - 356 downloads)
|
|
| |
|
Extreme Veteran
Posts: 445
Location: Beaumont TX | That is a really good job on the fan shroud. It looks almost exactly like my original one. It will really help your cooling. |
|
| |
|
Veteran
Posts: 129
| Thanks Sam but it did start getting hot on me when I got stuck in traffic in the middle of the day after being on the interstate for 30 miles, cooled back down once we got moving again. I'm hoping to try the derale 6 blade fan as soon as I get the adapter, it was on backorder when I ordered the fan. |
|
| |
|
Veteran
Posts: 129
| Lake pipes! I like them. I have all the AC components delivered except for the fan adapter. I'm going to change the fan to a 6 blade aftermarket. Should move more air. I'm not impressed with the amount of air the factory 4 blade moves.
 (20200627_102714_copy_756x1008.jpg) (20200627_102714_copy_756x1008.jpg)
 (20200627_102747_copy_756x1008.jpg) (20200627_102747_copy_756x1008.jpg)
 (20200627_102805_copy_756x1008.jpg) (20200627_102805_copy_756x1008.jpg)
Attachments
----------------
20200627_102714_copy_756x1008.jpg (361KB - 372 downloads)
20200627_102747_copy_756x1008.jpg (358KB - 369 downloads)
20200627_102805_copy_756x1008.jpg (416KB - 372 downloads)
|
|
| |
|
Extreme Veteran
Posts: 445
Location: Beaumont TX | I like the pipes!!! |
|
| |
|
Expert
Posts: 2003
Location: Branson, MO | bbdakota - 2020-06-21 7:26 PM
Thanks Sam but it did start getting hot on me when I got stuck in traffic in the middle of the day after being on the interstate for 30 miles, cooled back down once we got moving again. I'm hoping to try the derale 6 blade fan as soon as I get the adapter, it was on backorder when I ordered the fan.
You might consider an electric pusher fan in front of the radiator if you don't get satisfaction from your 6 blade. The pusher fan has been fantastic on our retro mods we built at Smitty's Classic Cars and they are temperature sensitive for engaging and disengaging so they only run when required. These are a must if you add A/C to your car. |
|
| |
|
Veteran
Posts: 129
| I'll certainly keep the pusher fan in mind! Thanks! |
|
| |
|
Veteran
Posts: 129
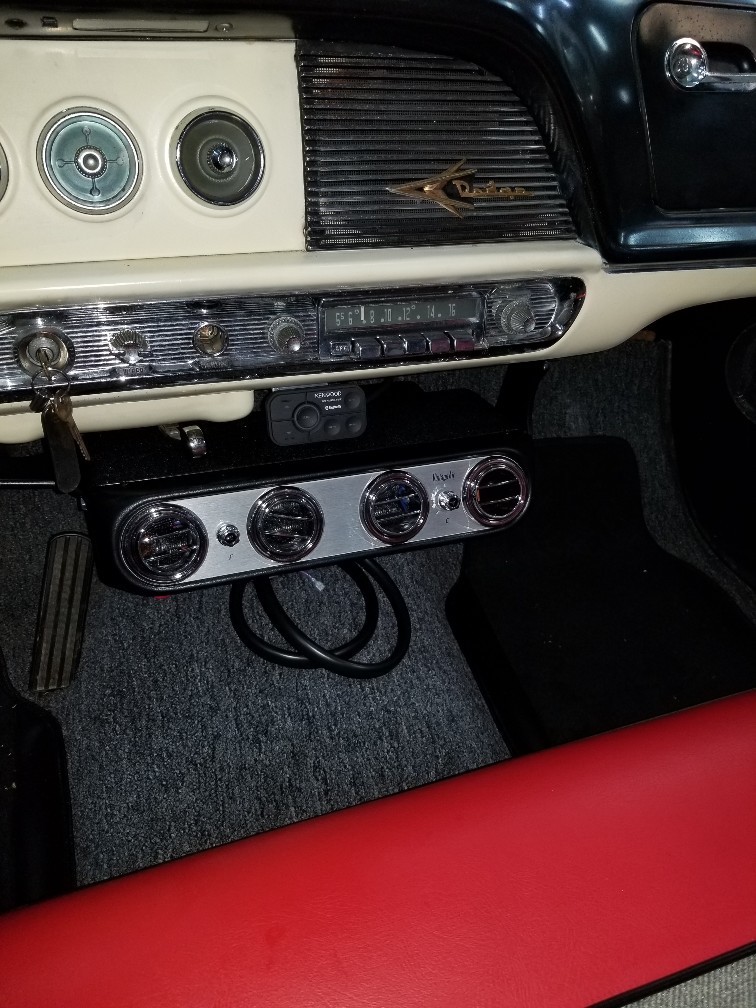
| Ac evaporator don't look like it sticks out as far as I was thinking. I was afraid it was going to stick out from under the dash far enough to look terrible but I'm satisfied with how it looks like it's going to fit. Just set on blocks right now.
 (20200628_161112_copy_756x1008.jpg) (20200628_161112_copy_756x1008.jpg)
Attachments
----------------
20200628_161112_copy_756x1008.jpg (190KB - 339 downloads)
|
|
| |
|
Expert 5K+
Posts: 9905
Location: Lower Mainland BC | .
The air outlets are about the same diameter as the 56 Dodge gauges. The A/C unit might blend in better if the panel that the air outlets sit in was white like the dash.
Just a thought.
|
|
| |
|
Regular
Posts: 81
| That's the same type of unit I am contemplating using in my 56 Dodge Cust Royal. Except mine is RHD with a 55 Plymouth dash. I would like to follow how you mount the unit and accommodate the slide for the vent. |
|
| |
|
Veteran
Posts: 129
| She got some new shoes today! Diamondback auburn premium radials! Rides and drives so much better then them old bias ply tires!
 (20200703_115059_copy_1008x756.jpg) (20200703_115059_copy_1008x756.jpg)
Attachments
----------------
20200703_115059_copy_1008x756.jpg (240KB - 336 downloads)
|
|
| |
|
Expert
Posts: 2003
Location: Branson, MO | That’s the way I’ll go when I get new shoes for my DeSoto. The old bias plys will go on the stock rims for show purposes if need be and the WSW radials will go on the wires for comfy driving. |
|
| |
|
Veteran
Posts: 129
| Finally got the ac installed. Not really a hurry with all kinds of events being canceled. I put a 12" pusher on the condenser wired to come on when the compressor kicks on. At idle in this heat, I'm getting 43 degrees at the vent. It didn't leak down overnight but time will tell if all the lines will not leak.
 (20200823_101554_copy_756x1008.jpg) (20200823_101554_copy_756x1008.jpg)
 (20200901_170253_copy_756x1008.jpg) (20200901_170253_copy_756x1008.jpg)
Attachments
----------------
20200823_101554_copy_756x1008.jpg (195KB - 295 downloads)
20200901_170253_copy_756x1008.jpg (248KB - 297 downloads)
|
|
| |
|
Regular
Posts: 81
| Do you have any photos of how you mounted the Air Con to the dash ? Thanks, Steve |
|
| |
|
Veteran
Posts: 129
| Steve, I just made some brackets and added a round rod to the edge so in case of an accident, maybe it wouldn't slice us open as bad
 (20200907_175626_copy_756x1008.jpg) (20200907_175626_copy_756x1008.jpg)
 (20200907_175640_copy_756x1008.jpg) (20200907_175640_copy_756x1008.jpg)
Attachments
----------------
20200907_175626_copy_756x1008.jpg (227KB - 293 downloads)
20200907_175640_copy_756x1008.jpg (169KB - 292 downloads)
|
|
| |
|
Elite Veteran
Posts: 655
Location: Finland | Did you get the temperature issue under control? If not I would guess that the cooling pocket in the cylinder block are full of crap. I assume that the ignition advance is big enough ,that can
make a difference if it is on the limit of overheating. |
|
| |
|
Veteran
Posts: 129
| Hi Ralf. I've done about all I know to do right now except change over to a Chevy water pump and smaller water pump pulley to spin the water pump and fan faster at idle. It'll run all day down the road and not get to hot. It'll idle with the hood open and not get to hot. But if I run it hard and long (get it heat soaked) than sit in traffic on a 90 plus degree day, it'll get hot enough to vapor lock. I've added an electric fuel pump at the tank to keep it from vaper lock.
Things I've done so far.
Took all the freeze plugs out and rinsed all the crap out of the coolant passages.
Added aluminum radiator.
Added 6 blade mechanical fan.
Added fan shroud.
Fixed the vaccum advance canister.
Pulled vaccum advance from manifold.
Added isolation spacer under carb.
Added insulated sleeve on fuel line from fuel pump to carb.
Set timing initial at 10, with vaccum added at idle it's about 26-27. It hasn't boiled. Maybe the electric fuel pump will keep it running and I can throw it in neutral, raise the rpm a bit to get the fan pulling more air and water pump moving more water and keep it from getting to hot. I haven't tried that yet. The only time I needed the electric fuel pump, it blew a fuse. I tapped on the side of it with a new fuse and it started working. Must have gotten trash in the vane. I do have a filter before the pump. |
|
| |
|
Elite Veteran
Posts: 655
Location: Finland | Jep you seem to have done it all....one more humble question...has the cylinderblock been recently re bored? For me the engine shop has machined too small piston clearances with overheating
as result. If that is the case you just have to drive on with that problem until it gets a little wear in the bores. |
|
| |
|
Veteran
Posts: 129
| No, it's a stock bore. I have not taken the water pump off to have a look at it. Looks as though it might have been replaced not to long ago and it don't leak sho really no reason to remove it. |
|
| |
|
Veteran
Posts: 129
| Update 1-10-21. The brakes have worked good but felt like they wasn't releasing all the way after driving for a while. Ended up being the perportioning valve. But I replaced about every thing else before finding out it was the preportioning valve.
The transmission cooler is plumbed and the rebuild transmission is doing great.
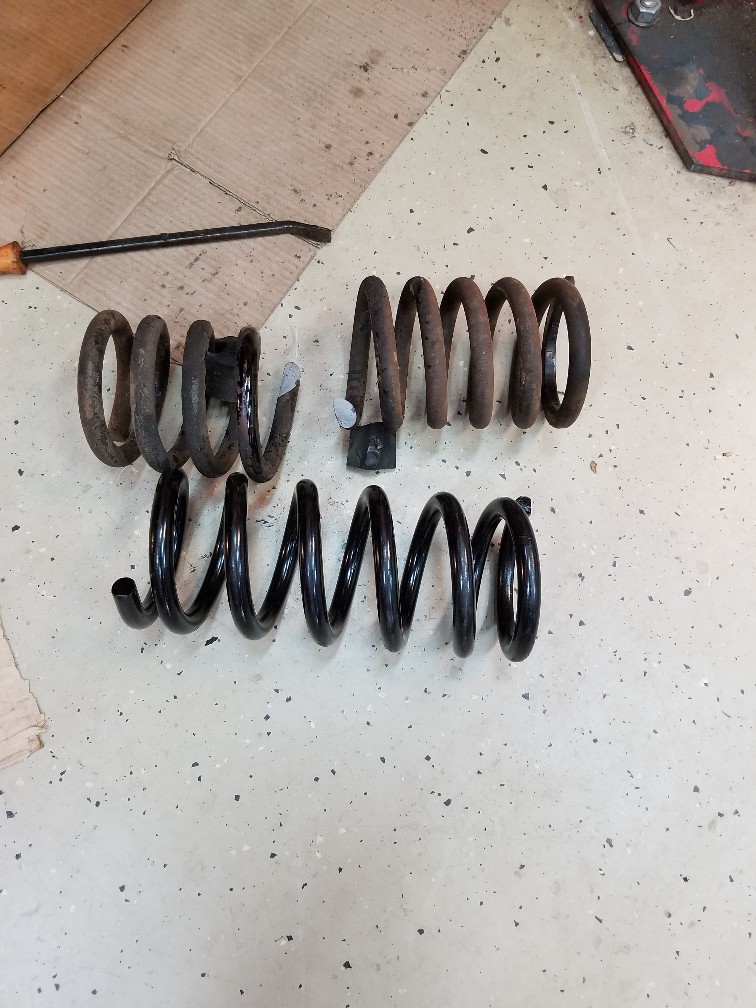
The car had a spring spacer in the driver's side coil spring but I never knew why. It sat level so I didn't think much of it. Well the driver spring broke! I ordered new springs from coil spring specialties. Using the repair manual I had, I measured the ride height and determined the car sat 1-1/4 lower than stock (middle of tolerance range). So I ordered 1-1/4 lowered heavy duty springs. After installing, the car sits 5/8" lower than before. I'm good with that. But wow what a difference in ride and handling. The car used to be really floaty, bouncy and a good bit of body roll. It also would wobble probably due to the spring spacer on the driver's side. Now it feels more stable and predictable, better planted but at the cost of feeling more bumps and feedback from the road conditions. Driving the car is getting more and more enjoyable.
 (20210109_115042_copy_756x1008.jpg) (20210109_115042_copy_756x1008.jpg)
 (20210109_140210_copy_1008x756.jpg) (20210109_140210_copy_1008x756.jpg)
Attachments
----------------
20210109_115042_copy_756x1008.jpg (186KB - 225 downloads)
20210109_140210_copy_1008x756.jpg (325KB - 231 downloads)
|
|
| |
|
Expert 5K+
Posts: 9672
Location: So. Cal | Who did you order the springs from? |
|
| |
|
Expert 5K+
Posts: 9905
Location: Lower Mainland BC | .
I'm not Scott but I just re-read Page 2 of this thread and found I ordered new springs from coil spring specialties"
Probably these guys: http://www.coilsprings.com/classic.aspx
NOW I want to learn more about the exact specs that Scott gave them to work with. Sounds like the change was very successful.
|
|
| |
|
Veteran
Posts: 129
| 56D500boy - 2021-01-10 7:23 PM
.
I'm not Scott but I just re-read Page 2 of this thread and found I ordered new springs from coil spring specialties"
Probably these guys: http://www.coilsprings.com/classic.aspx
NOW I want to learn more about the exact specs that Scott gave them to work with. Sounds like the change was very successful.
: )
Yes! You are correct! Coil spring specialties. In my manual, there is direction on measuring ride height. Basically measure the inside pivot point of the lower control arm and compare to the outside pivot point. The manual says my inside pivot point should have been between 0" to 1" lower. So using 1/2" as a base point, it appeared my car was sitting 1-1/4" low and I liked the height so that's what I ordered. Coil spring specialties has the stock spring specs but also gathered information such as "does it have ac" to compensate for the extra weight. I informed them I was using vintage air and a aluminum radiator. Ordering heavy duty springs helped with handling especially since I got them a little lower than stock. |
|
| |
|
Extreme Veteran
Posts: 445
Location: Beaumont TX | sorry about your spring breaking. I'm glad to know where to get them if my springs break. BTW. I used your advice about using RTV on the rear main seal when I replaced it and the new seal is not leaking now. So thanks for all of your advice.
Your care is really looking great... |
|
| |
|
Expert
Posts: 1208

Location: SWITZERLAND | Be happy Scott, that Dave (56D500boy) has the similar car, has acquired a huge know-how in th last years on his 56 Dodge, and what is most important: no secrets - he shares all, a valuable source. Thanks Dave. - SERGE -
Edited by sermey 2021-01-23 7:18 AM
|
|
| |
|
Expert 5K+
Posts: 9905
Location: Lower Mainland BC | sermey - 2021-01-23 4:11 AM Be happy Scott, that Dave (56D500boy) has the similar car, has acquired a huge know-how in the last years on his 56 Dodge, and what is most important: no secrets - he shares all, a valuable source. Thanks Dave. - SERGE
Thanks for noticing Serge. I try (to help - by sharing). Sometimes, (or often), I am asking for help trying to figure things out. There will be one of those posts, later today.
|
|
| |
|
Veteran
Posts: 129
| samstrader - 2021-01-23 12:34 AM
sorry about your spring breaking. I'm glad to know where to get them if my springs break. BTW. I used your advice about using RTV on the rear main seal when I replaced it and the new seal is not leaking now. So thanks for all of your advice.
Your care is really looking great...
Great samstrader! And thank you! |
|
| |
|
Veteran
Posts: 129
| sermey - 2021-01-23 6:11 AM
Be happy Scott, that Dave (56D500boy) has the similar car, has acquired a huge know-how in th last years on his 56 Dodge, and what is most important: no secrets - he shares all, a valuable source. Thanks Dave. - SERGE -
Yes! Much appreciated 56D500boy.
BTW SERGE, I've been watching the 3D emblem work you are doing. Looking good! Using Autocad and other 3D modeling software is my every day job so I have a good idea of the time you have invested. Thanks! |
|
| |
|
Veteran
Posts: 129
| Well once the new springs settled in good, I'm thinking it's a little too low but still not decided. I did order 3/8" thick spring insulators to raise it a bit (should raise it 3/4") but not sure I'll install them. I came out of a parking lot last week and drug the mufflers. I either need to be more cautious or raise it up a little. Anyway, tonight, the wife and I talked our son into driving us around a while so we enjoyed some good oldies music and took in the sights.
 (20210124_091727_copy_1008x756.jpg) (20210124_091727_copy_1008x756.jpg)
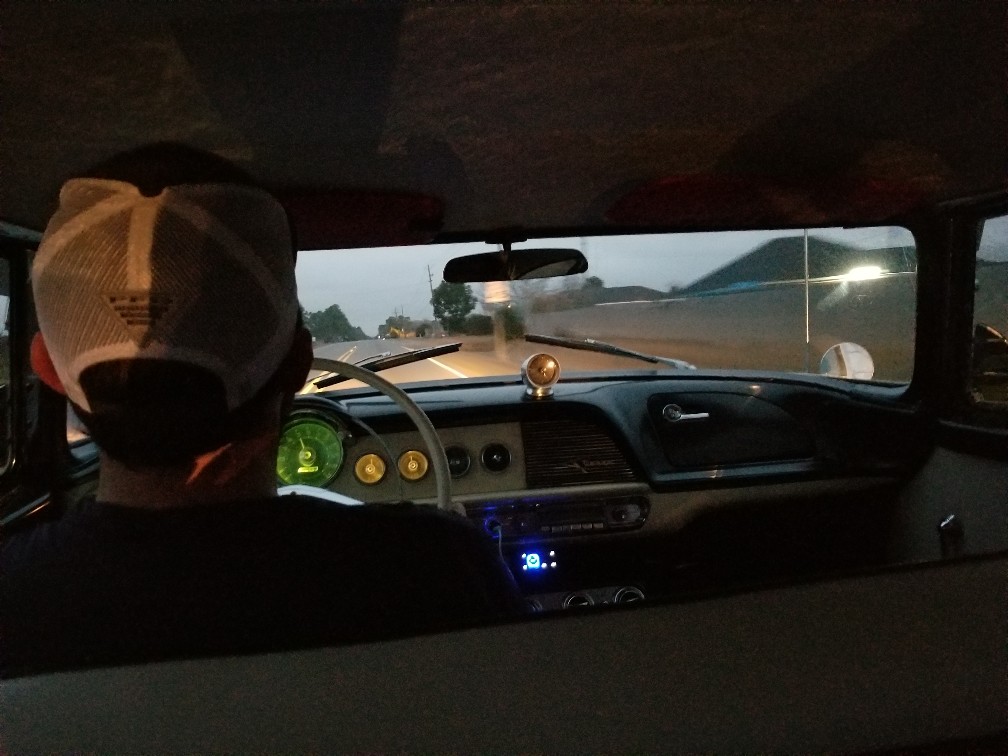 (20210124_174125_copy_1008x756.jpg) (20210124_174125_copy_1008x756.jpg)
Attachments
----------------
20210124_091727_copy_1008x756.jpg (239KB - 273 downloads)
20210124_174125_copy_1008x756.jpg (133KB - 278 downloads)
|
|
| |
|
Veteran
Posts: 129
| Update: the 56 dodge is been a blast! Everything is working great with the exception of the front brakes still are slow to release once the car is driven a while. It's a crazy problem. If at a complete stop, I stand on the brake pedal really hard, they will release correctly. The only thing I haven't replaced is the calipers. I might try replacing the calipers. I've checked the clearance on the master cylinder rod, replaced master cylinder, booster (the first booster did go bad), proportioning valve, installed a heat shield on the lines close to exhaust.....
On a different project, here is a sneak peak at
My 58 Plymouth I've been working on for way to long. Almost ready for paint and body. I'm a little reluctant to post much about it here because of the modern drivetrain, modern power rack and pinion/ Dakota front clip but that's what I wanted and much better than the manual steering, manual transmission, 4 wheel drum brakes the thing came with. It's a 5.7 hemi, NAG1 now.
 (20210515_134023_copy_1008x756.jpg) (20210515_134023_copy_1008x756.jpg)
 (20210508_193807_copy_1008x756.jpg) (20210508_193807_copy_1008x756.jpg)
Attachments
----------------
20210515_134023_copy_1008x756.jpg (343KB - 202 downloads)
20210508_193807_copy_1008x756.jpg (236KB - 205 downloads)
|
|
| |
|
Regular
Posts: 81
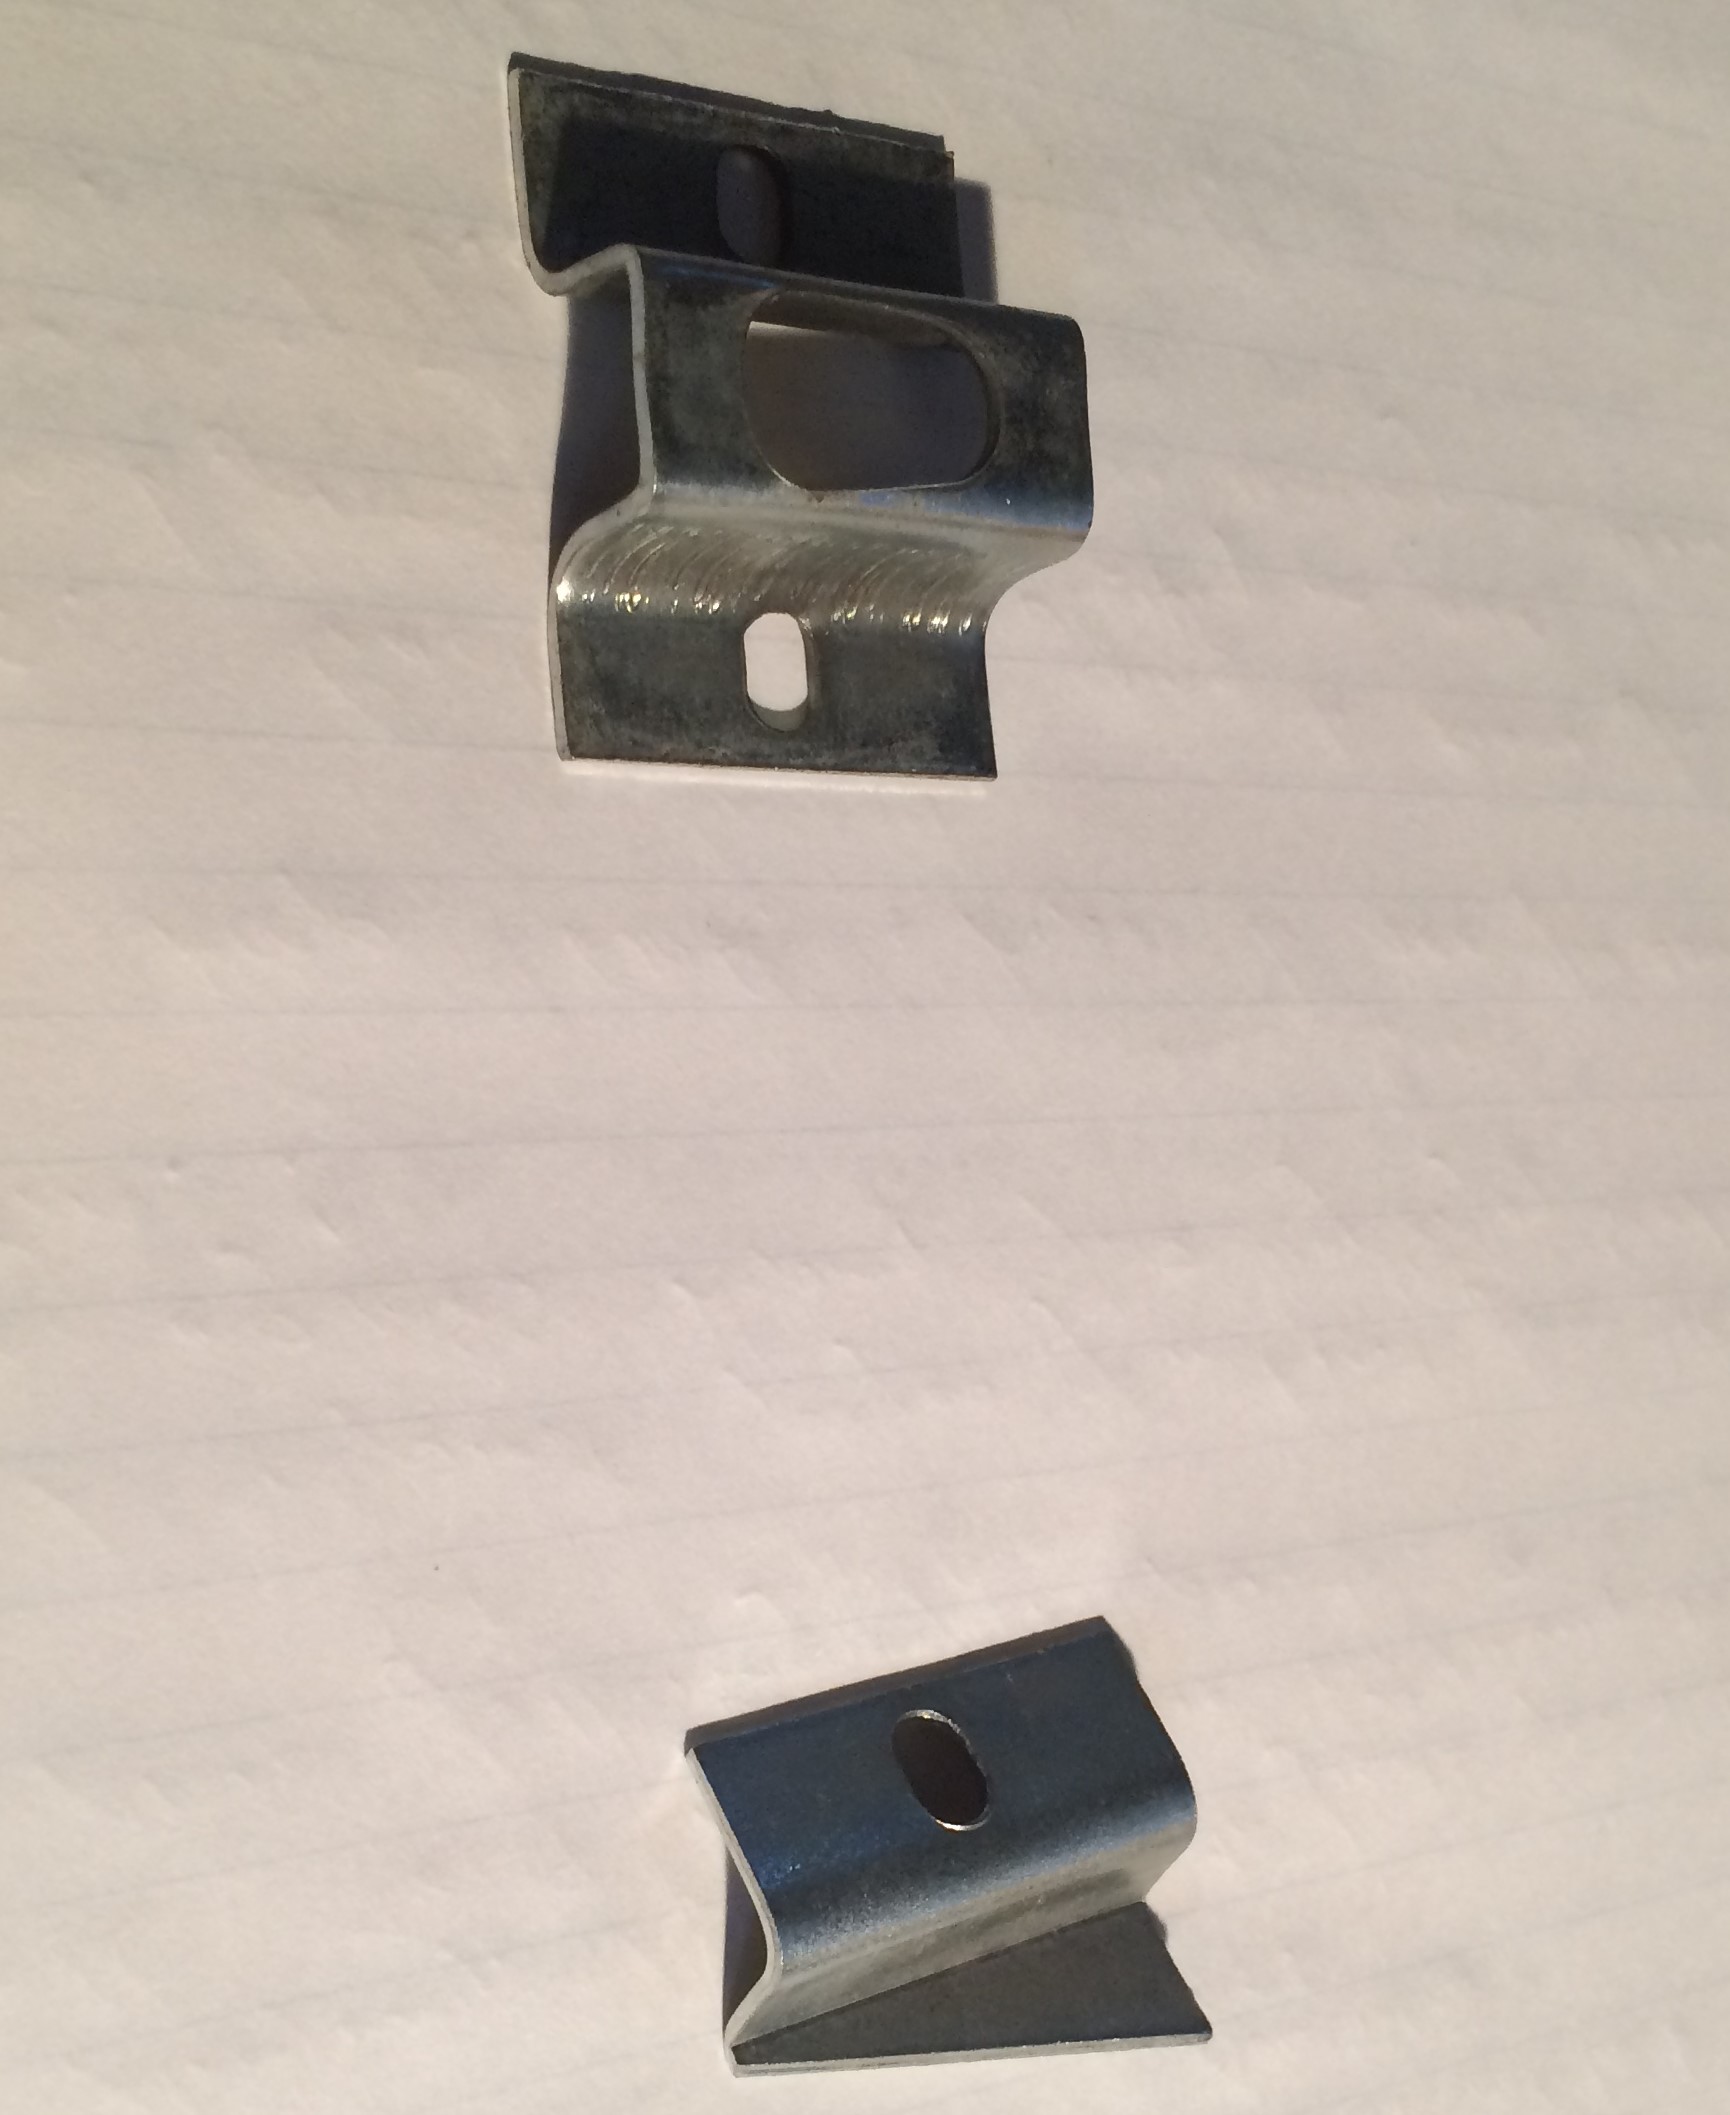
| Hi Scott, I am restoring a 1956 Dodge Custom Royal 4 door sedan in Australia. I am currently getting the doglegs and wheel arches rust repaired. I need to trial fit for the fender skirts now that i want to fit, but I can't figure out how the brackets at the front of the fender skirts attach/ work. Would you have any photos, or can you take a photo for me. It seems like the rattler rod should go into the front bracket, and the rear rod just rest beside or on top of the rear bracket? I'm not sure how that front bracket mounts in the wheel arch ? Hope you can help.. See photo of front and rear brackets i have which I hope are correct. Thanks, Steve
Edited by Steve1956 2021-12-07 1:51 AM
 (FS Brackets.jpg) (FS Brackets.jpg)
Attachments
----------------
FS Brackets.jpg (308KB - 116 downloads)
|
|
| |